Woke up this morning with snow on the ground. My daughter's school is closed. The snow has been replaced by rain this morning which turned everything into slush. They are calling for it to turn back into snow by noon. Jeez, I need to look at my driver's license and make sure I am still living in Tennessee.
This weekend in a three-day weekend for me because of President's day on Monday. While the temps aren't supposed to warm up much, I think it might be clear and sunny. Hopefully the wind won't be as strong as it has been. I hope I can get inside Frostbite and do a little damage this coming weekend.
Stupid weather.
Tuesday, February 9, 2010


Monday, February 8, 2010
Paying Uncle Sam
The weekend was a wash out. It was spitting snow, cloudy, and cold, cold. I wasn't jazzed about freezing inside Frostbite especially since I hadn't put the door back in yet. It was also very windy which, on top of making it feel even colder, threatened more damage to the roof and lift poles in the now empty camper. I opted to wait until next weekend.
Hoping it would put me in a better mood, I decided to do my taxes so I could start spending my refund before I get it. Last year I got about $1300 back and this on top of short selling a rental house I owned and the bank writing off nearly $30k to make up the price difference. I paid my accountant, "Ms. Lynne" at H & R Block nearly $400 to do this for me.
I've always been one to do my taxes with Turbo Tax and last year would have been no different except that, after entering my circumstances with the rental house, the program itself suggested that I go to a tax professional as it could no longer help me. Worried that an additional 30K untaxed added to my income would sink me, I had a couple of appointments with Ms. Lynne and she still managed to get me a nice refund.
Despite Ms. Lynne's success last year, I'm still a cheapskate so I was in front of Turbo Tax again on Saturday Morn. After a good bit of cussing and a couple of mini-strokes I had our taxes completed and I was to get a $545 refund.
In additional to being a cheapskate, I am also sort of greedy. I truly hate finances and have very little interest in learning wise ways of managing my money. I have grown accustomed to having tax returns in the 1K plus range. Cleverly I thought, I wonder if Ms. Lynne could do better? I convinced myself that she could and I made an appointment that afternoon to see her.
Long story short, Ms Lynne was as pleasant as ever and took her time with us. When all was said and done, she has secured a tax refund for us of $640 dollars.
Her fee was $199.
@#$%!
We didn't have $199. No problem, they can just take it out of the return money when it comes in.
For an extra 30 bucks.
!#$@#
A thought which never occurred to me until that moment was wondering if the fee was based on the time speant on the tax return. I glanced at my watch and realized with a shudder that we had been there an hour and a half. In less than a day, our tax return had gone from the 1 to 2K in my head, to $545 with turbo tax, to $399 after the accountant fees.
Lesson learned: Just use Turbo Tax and accept what it gives you, jeez.
Hoping it would put me in a better mood, I decided to do my taxes so I could start spending my refund before I get it. Last year I got about $1300 back and this on top of short selling a rental house I owned and the bank writing off nearly $30k to make up the price difference. I paid my accountant, "Ms. Lynne" at H & R Block nearly $400 to do this for me.
I've always been one to do my taxes with Turbo Tax and last year would have been no different except that, after entering my circumstances with the rental house, the program itself suggested that I go to a tax professional as it could no longer help me. Worried that an additional 30K untaxed added to my income would sink me, I had a couple of appointments with Ms. Lynne and she still managed to get me a nice refund.
Despite Ms. Lynne's success last year, I'm still a cheapskate so I was in front of Turbo Tax again on Saturday Morn. After a good bit of cussing and a couple of mini-strokes I had our taxes completed and I was to get a $545 refund.
In additional to being a cheapskate, I am also sort of greedy. I truly hate finances and have very little interest in learning wise ways of managing my money. I have grown accustomed to having tax returns in the 1K plus range. Cleverly I thought, I wonder if Ms. Lynne could do better? I convinced myself that she could and I made an appointment that afternoon to see her.
Long story short, Ms Lynne was as pleasant as ever and took her time with us. When all was said and done, she has secured a tax refund for us of $640 dollars.
Her fee was $199.
@#$%!
We didn't have $199. No problem, they can just take it out of the return money when it comes in.
For an extra 30 bucks.
!#$@#
A thought which never occurred to me until that moment was wondering if the fee was based on the time speant on the tax return. I glanced at my watch and realized with a shudder that we had been there an hour and a half. In less than a day, our tax return had gone from the 1 to 2K in my head, to $545 with turbo tax, to $399 after the accountant fees.
Lesson learned: Just use Turbo Tax and accept what it gives you, jeez.
Thursday, February 4, 2010
O Ye of Little Faith
It could be my imagination but I have been sensing the tingling of negative vibes around me. My wife has asked me on more than one recent occasion “So. You think you can put it back together?”
Translation: “Let’s face it, Kevin. So far, your . . . “work” for lack of a better term has resulted in turning a $1000 working camper into a $25 empty box with rusty wheels.
Mymother seamstress, when I suggested that we should add a valance of some type that circles the roof above the curtains (I have seen these in pictures of popups and they look great!), told me “I would wait and try these out to see if we need any adjustments.”
Translation: “Let’s face it, Kevin. You’re pretty much an idiot with these things and chances are you will continue to destroy this . . . “camper” for lack of a better word until nothing is left standing to hang curtains on.”
My own father told me during my last visit “You know, Kevin, for what you have planned, you could be talking about a year or two of work.”
Translation: “Let’s face it, Kevin. This thing is doomed to failure. If, and that’s a big, big IF, you somehow manage to beat the odds, pull off a miracle and not set the thing on fire, it will take 2 years for you to save enough money to have professionals fix the thing right.”
To all you naysayers I say:
Bah!
I mean these folks, so they tell me anyway, are reading my blog. How they could be any less than 100% confident in this project is beyond my understanding.
Now, I know there 2 other folks besides Dusty and those mentioned above who are following this blog that are far handier than I am with this stuff yet they remain suspiciously quiet. I’m starting to get the impression that they are here with me just for laughs and eagerly awaiting my gory, detailed descriptions of this project going down in flames. I'll do it to. Win or lose, do or die, success or failure, my project and this blog are intimately connected.
I'm committed to this thing. I'll do it or die trying. I don't care if I have to replace every splinter and screw in the thing and it costs me $20K. Frostbite and I are now engaged in mortal combat; a hand-to-hand, fix bayonets, chew out the other guy's guts and spit them out kind of combat. No way is some over-the-hill, seen-better-days, pos, dump heap of a wood box on wheels is going to beat me. Frostbite with the weight advantage might have me stunned with a Throat-Punch followed up with a particularly crafty Gutwrench-Brainbuster combination move. I may be down on the mat writhing in pain and Frostbite is climbing up the corner ropes for a Flying Elbow Drop but I can hack it.
Now I realize that I am essentially learning to swim by diving head first into the deep end but what I lack in skill and knowledge I make up for with dumb luck and blind, unwavering faith in the idea that it "can't be that hard."
This weekend I'm going to sneak up on Frostbite from behind, grab her around the throat and stun her with the Cobra Clutch quickly followed up with a Tombstone Pile driver which will hopefully render her unconscious.
Not ready for the pin-down just yet but by the end of the weekend it will be ME climbing the corner ropes for the Flying Elbow Drop. Just you wait and see!
Translation: “Let’s face it, Kevin. So far, your . . . “work” for lack of a better term has resulted in turning a $1000 working camper into a $25 empty box with rusty wheels.
My
Translation: “Let’s face it, Kevin. You’re pretty much an idiot with these things and chances are you will continue to destroy this . . . “camper” for lack of a better word until nothing is left standing to hang curtains on.”
My own father told me during my last visit “You know, Kevin, for what you have planned, you could be talking about a year or two of work.”
Translation: “Let’s face it, Kevin. This thing is doomed to failure. If, and that’s a big, big IF, you somehow manage to beat the odds, pull off a miracle and not set the thing on fire, it will take 2 years for you to save enough money to have professionals fix the thing right.”
To all you naysayers I say:
Bah!
I mean these folks, so they tell me anyway, are reading my blog. How they could be any less than 100% confident in this project is beyond my understanding.
Now, I know there 2 other folks besides Dusty and those mentioned above who are following this blog that are far handier than I am with this stuff yet they remain suspiciously quiet. I’m starting to get the impression that they are here with me just for laughs and eagerly awaiting my gory, detailed descriptions of this project going down in flames. I'll do it to. Win or lose, do or die, success or failure, my project and this blog are intimately connected.
I'm committed to this thing. I'll do it or die trying. I don't care if I have to replace every splinter and screw in the thing and it costs me $20K. Frostbite and I are now engaged in mortal combat; a hand-to-hand, fix bayonets, chew out the other guy's guts and spit them out kind of combat. No way is some over-the-hill, seen-better-days, pos, dump heap of a wood box on wheels is going to beat me. Frostbite with the weight advantage might have me stunned with a Throat-Punch followed up with a particularly crafty Gutwrench-Brainbuster combination move. I may be down on the mat writhing in pain and Frostbite is climbing up the corner ropes for a Flying Elbow Drop but I can hack it.
Now I realize that I am essentially learning to swim by diving head first into the deep end but what I lack in skill and knowledge I make up for with dumb luck and blind, unwavering faith in the idea that it "can't be that hard."
This weekend I'm going to sneak up on Frostbite from behind, grab her around the throat and stun her with the Cobra Clutch quickly followed up with a Tombstone Pile driver which will hopefully render her unconscious.
Not ready for the pin-down just yet but by the end of the weekend it will be ME climbing the corner ropes for the Flying Elbow Drop. Just you wait and see!
Good Advice from Dusty
First off, thanks for resisting the urge to write "no, No, NO You Idiot!" in your comments. I do appreciate your interest in what I am doing and willingness to chime in and share some of your knowledge.
The wheel bearing info is wonderful but I’m not diving into that just yet. I’ll refer back to your comments when I’m ready. Regarding the lift system, I fear I might already have a pdf of a photocopy of that guide. It is for lift systems in 1985 and later Starcraft campers and mentions on the front that it also covers *most* 1983 and 1984 campers. I just have to hope that my camper falls into the *most* category.
Also, the lift system itself is not broken in that the roof goes up and down ok. It's the rod that hooks to the hitch when it is raised all the way and holds the roof up. I'm hoping that it is detachable and replaceable via Starcraft. I did some poking around though and wonder if installing an electric wench meant for popups would work. Do they stop and hold the cable when raised or do they also depend on some type of hook?
I'll have to look into this further.
Money's a little tight this weekend so I'm just going to get essentials for what I hope to do or at least get started with.
* Silicone caulk & gun
* Solvent for removing caulk
* 1 gal. White bathroom mold resistant paint for the inside of the box walls. Note this this will be covered by insulation and paneling which is why I'm not getting a glossy type paint.
* 1 2 ft square piece of wood (you had the type pegged exactly, Dusty)
* Brackets and screws to install the wood piece
* New insulation (the type dusty suggested. I just can't remember how to spell it at the moment)
* A light wiring kit for trailers per Dusty's suggestion. That was a good idea. The wires on lights of the trailer now are all the same color.
If I could at least finish removing the inside panels, remove water damaged insulation, and clean and paint the inside walls it would be a step in the right direction.
If the weather cooperates, I can remove old caulk and re-caulk the corners and roof of the camper.
If all this goes off without a hitch, I can at least start to repair the hole in the corner.
This afternoon when I get home, however, I am going to call Starcraft and inquire about parts and manuals.
The wheel bearing info is wonderful but I’m not diving into that just yet. I’ll refer back to your comments when I’m ready. Regarding the lift system, I fear I might already have a pdf of a photocopy of that guide. It is for lift systems in 1985 and later Starcraft campers and mentions on the front that it also covers *most* 1983 and 1984 campers. I just have to hope that my camper falls into the *most* category.
Also, the lift system itself is not broken in that the roof goes up and down ok. It's the rod that hooks to the hitch when it is raised all the way and holds the roof up. I'm hoping that it is detachable and replaceable via Starcraft. I did some poking around though and wonder if installing an electric wench meant for popups would work. Do they stop and hold the cable when raised or do they also depend on some type of hook?
I'll have to look into this further.
Money's a little tight this weekend so I'm just going to get essentials for what I hope to do or at least get started with.
* Silicone caulk & gun
* Solvent for removing caulk
* 1 gal. White bathroom mold resistant paint for the inside of the box walls. Note this this will be covered by insulation and paneling which is why I'm not getting a glossy type paint.
* 1 2 ft square piece of wood (you had the type pegged exactly, Dusty)
* Brackets and screws to install the wood piece
* New insulation (the type dusty suggested. I just can't remember how to spell it at the moment)
* A light wiring kit for trailers per Dusty's suggestion. That was a good idea. The wires on lights of the trailer now are all the same color.
If I could at least finish removing the inside panels, remove water damaged insulation, and clean and paint the inside walls it would be a step in the right direction.
If the weather cooperates, I can remove old caulk and re-caulk the corners and roof of the camper.
If all this goes off without a hitch, I can at least start to repair the hole in the corner.
This afternoon when I get home, however, I am going to call Starcraft and inquire about parts and manuals.
Wednesday, February 3, 2010
big plans, BIG PLANS! Part II
Ok, the outside. Initially I plan to just do a good cleaning. Here is a basic list:
* I will use some type of solvent to remove all the old caulking and goo. (I will have already done this on the corners around the lift poles in the pre-phase work *hopefully*)
* I will try to clean the outside as much as I possibly can. I'll have to find the right kind of goo that will do the best job.
* re-paint the outside panels white. Now I am completely unsure as to what type of paint I need for this. I would like it shiny white. Going to a real paint shop is not out of the question.
* remove the current detail stripes and stickers on the outside. I am divided over replacing the word "Starcraft" on the camper. I have no particular allegiance to this company but my wife thinks she would like to keep it. Maybe replacing the Starcraft "star" design with a blue snowflake would be cool. I haven't decided yet.
* re-paint the trailer base, hitch, fenders, and bumpers the same color blue as bluebell
* add detail stickers or stripes of some type that is the same color as bluebell.
* add the word "Frostbite" on the back in some type of cool font the same color as bluebell.
* I would like the metal lip around the roof and box to be shiny again. Not sure if cleaning and polishing will do the trick or not. Replacing the metal is probably out of the question since it would require taking off the roof, I suspect. I'll decide then.
* replace the four locks that hold the roof to the box when the roof is lowered with shiny new ones. I've seen these for sale so that should be easy.
* replace the battery box on the hitch that holds the 12v battery. The top is completely broken and the battery is exposed to rain and snow which is probably why it isn't working. I probably shouldn't replace the battery if it is not covered properly so a new box will come before a new battery.
* replace the door latch on the lower door. It works but it is loose in the hole and I don't have a key for it. I'm hoping they are not too expensive.
* replace the vent on the top of the roof. The cover has a good 6-8 inch crack in it. I have shopped for these and see that they do come in a standard size (14in). I am tempted to get the ones with a fan built it but that would require that I wire it to the electric system. I'm hoping that won't be too complicated. This one I will probably do in the pre-phase since the cracked vent is surely contributing to the water leak inside.
Finally, I need to do something about the lift system. I am going to relate some damage that I had to have done myself since I brought Frostbite home. There is a long bar that is attached to the main lift cable that is cranked along with the cable when raising the roof. There is a gap in the lower part of the hitch that the bar, once the roof is the correct height, falls into and hooks. This is what holds the roof up.
Well, that bar is bent now at a good 25-30 degree angle. I don't know exactly how it got bent but I suspect that it got hung up on the opening underneath when I was raising it. Instead of sliding forward, it bent. I am very conscious of not using too much force when raising it because it always raised easily.
Apparently, not conscious enough as recently, I hit resistance when I know I shouldn't have. I went underneath and that is when I noticed that the bar was bent and not going through the opening at the front of the trailer. I had a neighbor kid turn the crank while I was underneath guiding the bar through the opening. The roof raised but the bent bar would not fall down and hook where it needed too. The bend in the bar kept it raised several inches.
Now I can get around this by just raising until it gets to where the bar *should* hook and then hooking the trailer safety chains around the crank to hold it in place. However, I would like there to be a working hook. When the weather clears I'll be able to get underneath and take a better survey of the situation. The main cable attaches to a short horizontal bar to which four smaller cables are attached. Each of these cables lead to the four posts in the corners via pulleys underneath. I noted that these cable are nice and silver and didn't appear frayed which has to be a good thing. I'm not 100% sure but I think the bar with the hook is attached to this horizontal bar somehow. I'm really, Really hoping that the hook bar is attached this horizontal bar with a screw and nut *crosses fingers* but it could also be welded there. If it is attached with a nut and bolt, I can remove it and replace it. If not, I'm sort of stuck.
Now I am faced with a problem. I am terrified of un-attaching all of the cables to remove the hook bars. First, the lift system is working. It might stop working when I reattach it because it is probably the most complicated and important part of the entire camper.
One idea I had was to saw off the hook bar (after making sure to paint the spot in the main cable where the hook bar *should* hook which indicates that the roof is raised to the proper height) and get a strong cable with a hook of some sort on one end and attach that cable somehow to the horizontal bar that connects the four lift pole cables on the other end. I could attach this cable to the main cable with plastic zip ties or something so it would pass though the opening underneath when the roof is being raised.
I am not a welder and, while I am not afraid of getting the equipment and giving it a shot, I'm not too jazzed about risking the roof falling down on my family inside on my first try at the skill. Also, I have a better than average chance of setting the camper, myself, my house or all three on fire.
This setback is most frustrating because I must have caused it myself. The lift system and hook was working fine when I bought the camper.
Don't worry. I'm sure I'll find a way to break all the corner lift cables before I'm done. I've already found and printed a file that details how the cables are run through the lift poles.
It's complicated to say the very least.
There is an element of inevitability to this, I fear.
* I will use some type of solvent to remove all the old caulking and goo. (I will have already done this on the corners around the lift poles in the pre-phase work *hopefully*)
* I will try to clean the outside as much as I possibly can. I'll have to find the right kind of goo that will do the best job.
* re-paint the outside panels white. Now I am completely unsure as to what type of paint I need for this. I would like it shiny white. Going to a real paint shop is not out of the question.
* remove the current detail stripes and stickers on the outside. I am divided over replacing the word "Starcraft" on the camper. I have no particular allegiance to this company but my wife thinks she would like to keep it. Maybe replacing the Starcraft "star" design with a blue snowflake would be cool. I haven't decided yet.
* re-paint the trailer base, hitch, fenders, and bumpers the same color blue as bluebell
* add detail stickers or stripes of some type that is the same color as bluebell.
* add the word "Frostbite" on the back in some type of cool font the same color as bluebell.
* I would like the metal lip around the roof and box to be shiny again. Not sure if cleaning and polishing will do the trick or not. Replacing the metal is probably out of the question since it would require taking off the roof, I suspect. I'll decide then.
* replace the four locks that hold the roof to the box when the roof is lowered with shiny new ones. I've seen these for sale so that should be easy.
* replace the battery box on the hitch that holds the 12v battery. The top is completely broken and the battery is exposed to rain and snow which is probably why it isn't working. I probably shouldn't replace the battery if it is not covered properly so a new box will come before a new battery.
* replace the door latch on the lower door. It works but it is loose in the hole and I don't have a key for it. I'm hoping they are not too expensive.
* replace the vent on the top of the roof. The cover has a good 6-8 inch crack in it. I have shopped for these and see that they do come in a standard size (14in). I am tempted to get the ones with a fan built it but that would require that I wire it to the electric system. I'm hoping that won't be too complicated. This one I will probably do in the pre-phase since the cracked vent is surely contributing to the water leak inside.
Finally, I need to do something about the lift system. I am going to relate some damage that I had to have done myself since I brought Frostbite home. There is a long bar that is attached to the main lift cable that is cranked along with the cable when raising the roof. There is a gap in the lower part of the hitch that the bar, once the roof is the correct height, falls into and hooks. This is what holds the roof up.
Well, that bar is bent now at a good 25-30 degree angle. I don't know exactly how it got bent but I suspect that it got hung up on the opening underneath when I was raising it. Instead of sliding forward, it bent. I am very conscious of not using too much force when raising it because it always raised easily.
Apparently, not conscious enough as recently, I hit resistance when I know I shouldn't have. I went underneath and that is when I noticed that the bar was bent and not going through the opening at the front of the trailer. I had a neighbor kid turn the crank while I was underneath guiding the bar through the opening. The roof raised but the bent bar would not fall down and hook where it needed too. The bend in the bar kept it raised several inches.
Now I can get around this by just raising until it gets to where the bar *should* hook and then hooking the trailer safety chains around the crank to hold it in place. However, I would like there to be a working hook. When the weather clears I'll be able to get underneath and take a better survey of the situation. The main cable attaches to a short horizontal bar to which four smaller cables are attached. Each of these cables lead to the four posts in the corners via pulleys underneath. I noted that these cable are nice and silver and didn't appear frayed which has to be a good thing. I'm not 100% sure but I think the bar with the hook is attached to this horizontal bar somehow. I'm really, Really hoping that the hook bar is attached this horizontal bar with a screw and nut *crosses fingers* but it could also be welded there. If it is attached with a nut and bolt, I can remove it and replace it. If not, I'm sort of stuck.
Now I am faced with a problem. I am terrified of un-attaching all of the cables to remove the hook bars. First, the lift system is working. It might stop working when I reattach it because it is probably the most complicated and important part of the entire camper.
One idea I had was to saw off the hook bar (after making sure to paint the spot in the main cable where the hook bar *should* hook which indicates that the roof is raised to the proper height) and get a strong cable with a hook of some sort on one end and attach that cable somehow to the horizontal bar that connects the four lift pole cables on the other end. I could attach this cable to the main cable with plastic zip ties or something so it would pass though the opening underneath when the roof is being raised.
I am not a welder and, while I am not afraid of getting the equipment and giving it a shot, I'm not too jazzed about risking the roof falling down on my family inside on my first try at the skill. Also, I have a better than average chance of setting the camper, myself, my house or all three on fire.
This setback is most frustrating because I must have caused it myself. The lift system and hook was working fine when I bought the camper.
Don't worry. I'm sure I'll find a way to break all the corner lift cables before I'm done. I've already found and printed a file that details how the cables are run through the lift poles.
It's complicated to say the very least.
There is an element of inevitability to this, I fear.
Tuesday, February 2, 2010
big plans, BIG PLANS! Part I
Given the current lull in my work on Frostbite (Thank you, stupid @#$ TN weather!). I thought I would summarize my plans for her renovation. I know I've mentioned these throughout my previous posts but I think it would benefit me to list them all in one place.
I've separated all the work into two major phases:
Phase 1: the inside of the camper
Phase 2: the outside
My goal in this is to get Frostbite "campable" meaning that I can take my family out camping for a weekend in it and enjoy the new "dry" and comfortable inside. The outside might still make us look like the Beverly Hillbillies when we are traveling but who cares about that?
Unfortunately, I will have to initially address the roof problems. That would be sort of a "Pre" Phase 1 fix. Obviously, I don't want to get the inside fixed up and have the new stuff water damaged.
Here is what I am going to do on the inside:
1. Cut out and replace the 1 to 1 1/2 ft square of wood in the back corner that is definitely water damaged. If you remember, I poked right through with a wall scraper. Not 100% sure how to best do this but I'll get a piece of wood similar to what is already there and hope to be inspired.
2. Fix the lighting. With all the inside paneling out, the wiring to the trailer lights will be exposed and I hope to take the opportunity to get the wiring correct and actually running inside the camper. Currently, *someone* rewired the outside lights by running the wires outside the camper. From the connection on my tow vehicle (Bluebell) the wires are bundled and run hanging underneath the length of the camper to the back where each wire is run outside into each of the lights. Here is what I am talking about:

2. Replace all the wood paneling surrounding the box. I had originally planned on just painting the paneling white but since I found some water damage at the back, I figured I may as well go ahead and rip it all out so I can then rip out all the insulation. I'm going to clean the area first with a bleach solution to kill any mold then paint the inside of the outer wall with some type of mold resistant paint like you would use in a bathroom. I will then replace the cheap cardboard insulation (currently water damaged in parts) with something else. Not sure what I need here but I'm going to go to Lowes and hopefully be inspired.
I am also going to clean and repaint all the wood braces. Some of the inside wall braces "appear" to be water damaged but they are actually just water stained. The wood itself seems very solid.
With that done, I'll attach new white paneling around the box.
3. Paint the ceiling white. I'm thinking of getting a paint sprayer because I pretty much suck at painting. I can do a roller ok but usually pretty sloppy regarding edges and such. I'll definitely get some painter's tape and a drop cloth and we'll see what happens.
4. I'm thinking of using some type of clear coat inside just for the shininess aspect and to give extra protection to the paneling from spills and such. I have no idea how many coats of paint I'll need or how many coats of clear coat. Definitely more that one, of course. I suppose it will make itself obvious how many as each coat dries. Hopefully.
5. With the inside box complete and the ceiling painted, I'm going to attempt to fill in all the screw holes in the floor that I can find with wood filler. I'm thinking of attaching the boxes to the inside with L-brackets instead of using screws directly through the wood so the old holes won't match the new boxes anyway which brings me to my next improvement.
6. I am going to rebuild the inside boxes. The boxes themselves are made from paneling and dowels. Some of this paneling is water damaged and stained. All of the table tops have a bit of water damage in the corners and would need replaced anyway. Using the existing boxes as patterns for the new, I think I can do it. Additionally, I think I will also replace the cabinets underneath the sink and create a space for a small microwave to be permanently installed. I intend to use a standalone air conditioner that is vented through the floor and there might be a way to build a permanent place for it to be as well.
There is also a jerry-rigged space under the stove for the fridge (BTW, I finally took it inside and plugged it up. It works!) that I hope to improve upon.
7. As the boxes are built, I will paint them white and clear coat them while they are still outside the camper and install them as they are finished.
8. Now I realize that this one is technically "outside" work but it really needs done before I tug Frostbite anywhere. I think I will replace the tires with new ones. I've checked and this is not all that expensive. Additionally (I know I am crazy for thinking I can do this) I plan on replacing and repacking the wheel bearings. I've printing out a step-by-step how-to from the internet and I think it is something I can do. I also hope to get underneath with a wire brush and scrape the rust from the axle and lift bars. Hopefully, they won't disintegrate on me and I'll find real metal underneath. After that I will paint the axle and lift rods with some type of rust replacer or something. I figure that has to be better than just leaving them rusted.
That would take me through Phase 1.
There is, of course, the "Pre" phase one where I need to remove existing caulk and then re-caulk the roof, corners, and any other seams I can find outside. Dusty also pointed out something that I didn't even know existed, a Roof Gasket. I haven't checked it yet but I am pretty sure just based on everything else in this camper that it needs replaced as well. I'll have to research and see if I can get a replacement or if there is something else I can use in its place.
Coming up next: The outside
I've separated all the work into two major phases:
Phase 1: the inside of the camper
Phase 2: the outside
My goal in this is to get Frostbite "campable" meaning that I can take my family out camping for a weekend in it and enjoy the new "dry" and comfortable inside. The outside might still make us look like the Beverly Hillbillies when we are traveling but who cares about that?
Unfortunately, I will have to initially address the roof problems. That would be sort of a "Pre" Phase 1 fix. Obviously, I don't want to get the inside fixed up and have the new stuff water damaged.
Here is what I am going to do on the inside:
1. Cut out and replace the 1 to 1 1/2 ft square of wood in the back corner that is definitely water damaged. If you remember, I poked right through with a wall scraper. Not 100% sure how to best do this but I'll get a piece of wood similar to what is already there and hope to be inspired.
2. Fix the lighting. With all the inside paneling out, the wiring to the trailer lights will be exposed and I hope to take the opportunity to get the wiring correct and actually running inside the camper. Currently, *someone* rewired the outside lights by running the wires outside the camper. From the connection on my tow vehicle (Bluebell) the wires are bundled and run hanging underneath the length of the camper to the back where each wire is run outside into each of the lights. Here is what I am talking about:
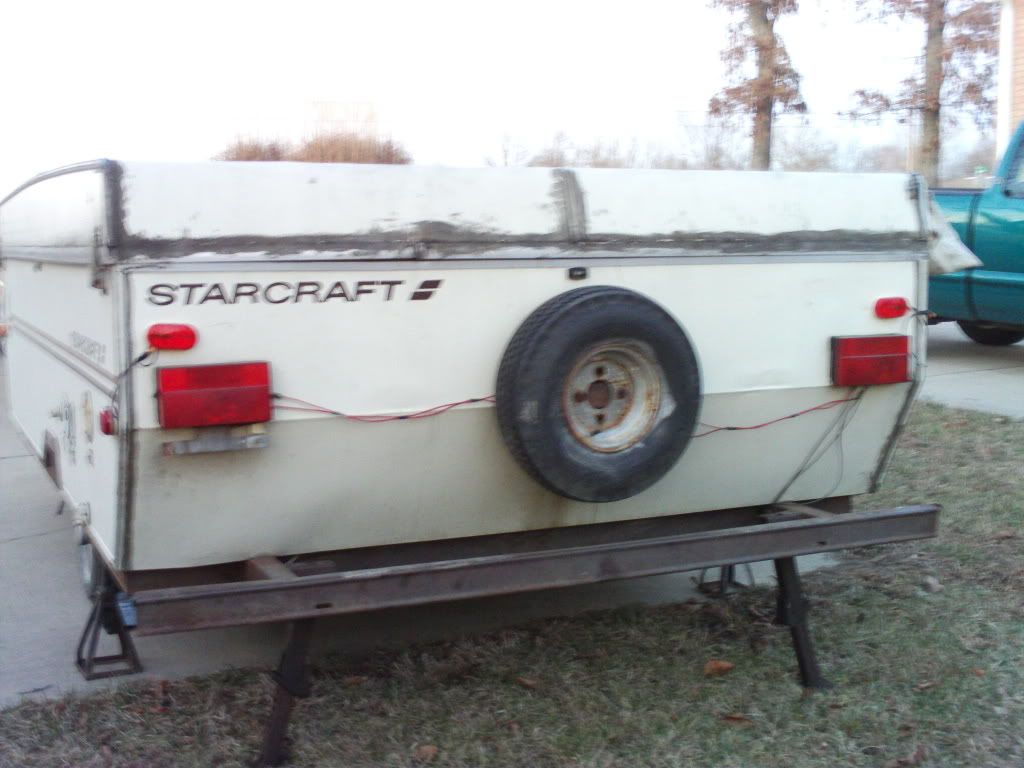
Man, there has to be a better way.
2. Replace all the wood paneling surrounding the box. I had originally planned on just painting the paneling white but since I found some water damage at the back, I figured I may as well go ahead and rip it all out so I can then rip out all the insulation. I'm going to clean the area first with a bleach solution to kill any mold then paint the inside of the outer wall with some type of mold resistant paint like you would use in a bathroom. I will then replace the cheap cardboard insulation (currently water damaged in parts) with something else. Not sure what I need here but I'm going to go to Lowes and hopefully be inspired.
I am also going to clean and repaint all the wood braces. Some of the inside wall braces "appear" to be water damaged but they are actually just water stained. The wood itself seems very solid.
With that done, I'll attach new white paneling around the box.
3. Paint the ceiling white. I'm thinking of getting a paint sprayer because I pretty much suck at painting. I can do a roller ok but usually pretty sloppy regarding edges and such. I'll definitely get some painter's tape and a drop cloth and we'll see what happens.
4. I'm thinking of using some type of clear coat inside just for the shininess aspect and to give extra protection to the paneling from spills and such. I have no idea how many coats of paint I'll need or how many coats of clear coat. Definitely more that one, of course. I suppose it will make itself obvious how many as each coat dries. Hopefully.
5. With the inside box complete and the ceiling painted, I'm going to attempt to fill in all the screw holes in the floor that I can find with wood filler. I'm thinking of attaching the boxes to the inside with L-brackets instead of using screws directly through the wood so the old holes won't match the new boxes anyway which brings me to my next improvement.
6. I am going to rebuild the inside boxes. The boxes themselves are made from paneling and dowels. Some of this paneling is water damaged and stained. All of the table tops have a bit of water damage in the corners and would need replaced anyway. Using the existing boxes as patterns for the new, I think I can do it. Additionally, I think I will also replace the cabinets underneath the sink and create a space for a small microwave to be permanently installed. I intend to use a standalone air conditioner that is vented through the floor and there might be a way to build a permanent place for it to be as well.
There is also a jerry-rigged space under the stove for the fridge (BTW, I finally took it inside and plugged it up. It works!) that I hope to improve upon.
7. As the boxes are built, I will paint them white and clear coat them while they are still outside the camper and install them as they are finished.
8. Now I realize that this one is technically "outside" work but it really needs done before I tug Frostbite anywhere. I think I will replace the tires with new ones. I've checked and this is not all that expensive. Additionally (I know I am crazy for thinking I can do this) I plan on replacing and repacking the wheel bearings. I've printing out a step-by-step how-to from the internet and I think it is something I can do. I also hope to get underneath with a wire brush and scrape the rust from the axle and lift bars. Hopefully, they won't disintegrate on me and I'll find real metal underneath. After that I will paint the axle and lift rods with some type of rust replacer or something. I figure that has to be better than just leaving them rusted.
That would take me through Phase 1.
There is, of course, the "Pre" phase one where I need to remove existing caulk and then re-caulk the roof, corners, and any other seams I can find outside. Dusty also pointed out something that I didn't even know existed, a Roof Gasket. I haven't checked it yet but I am pretty sure just based on everything else in this camper that it needs replaced as well. I'll have to research and see if I can get a replacement or if there is something else I can use in its place.
Coming up next: The outside
Monday, February 1, 2010
Poor Frostbite
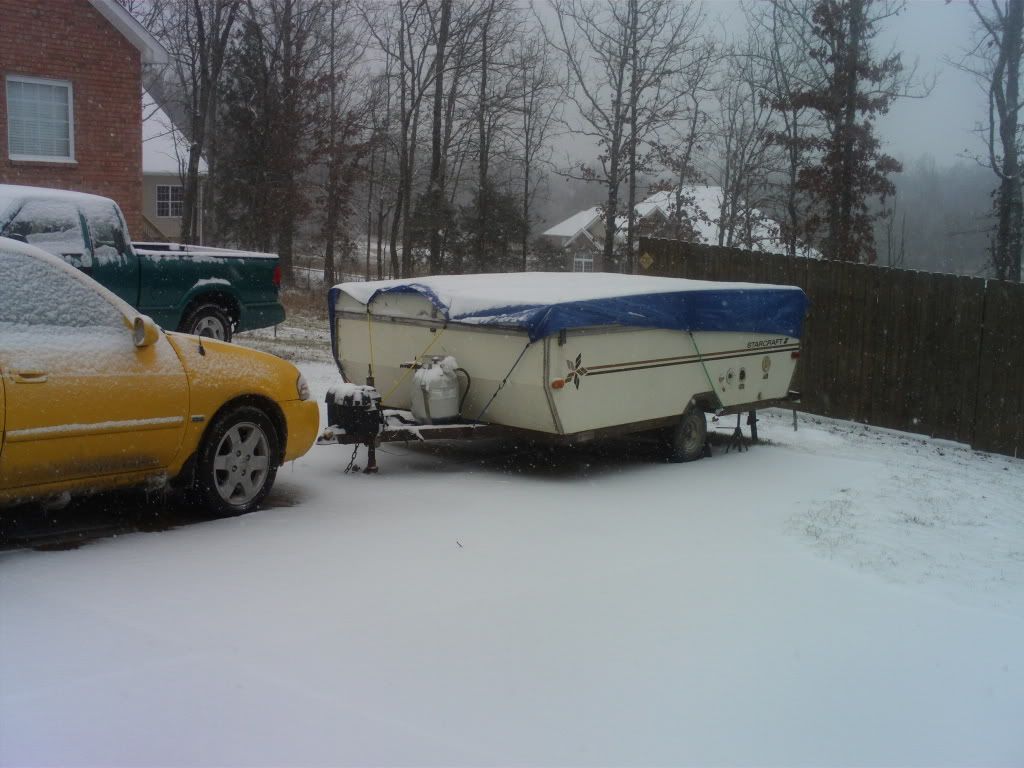
Snowed in Again!
Took this picture on Friday around 1PM. It continued to snow and sleet for 24 more hours. I went out Saturday and pushed 5 or 6 inches of snow and ice off the roof just to relieve the weight and to get it off before it melts.
No work this weekend. I didn't even get to Lowes to buy supplies.
Subscribe to:
Posts (Atom)