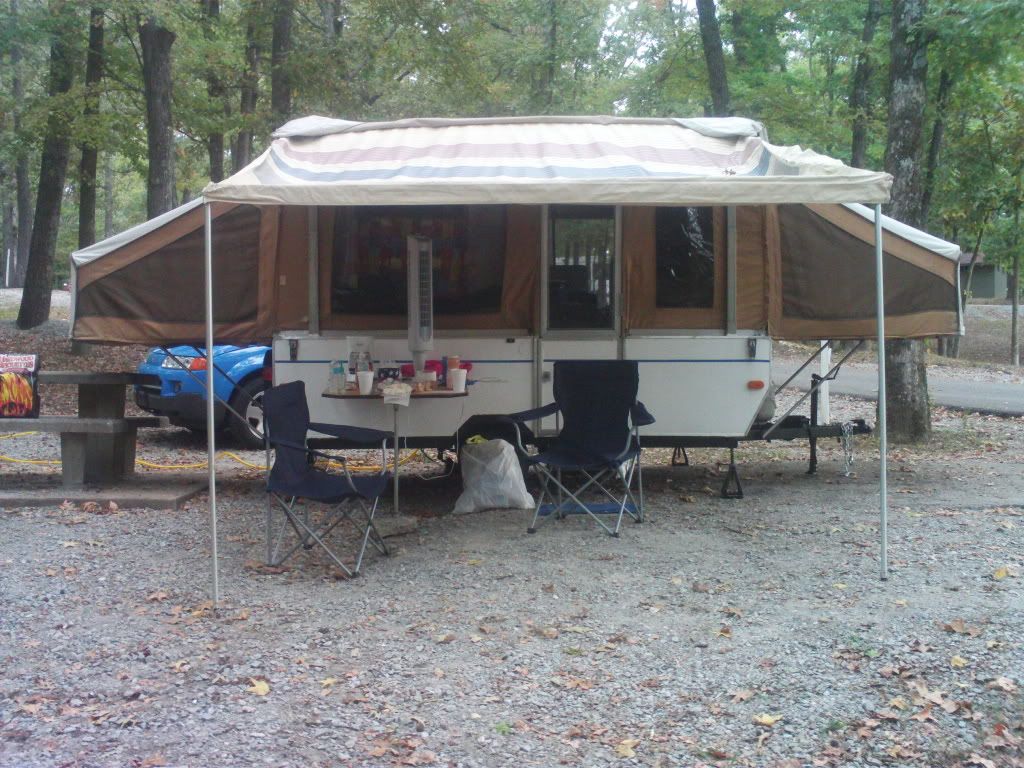
It's raining today so no work this afternoon. It wasn't raining yesterday but I still didn't manage to get out to work on Frostbite. However, I did want to give a plug to a business who came to our home and cleaned our carpets on Saturday.
Stars and Stripes Cleaning Services Inc
www.starsandstripescleaning.com
4521 Highway 70
White Bluff, TN 37187-9237
(615) 797-3027
Open Mon-Sat 8am-5pm
A tech arrived on Sat. and spent a good couple of hours on our carpet. This was no easy task as 4 years, 1 8 year old, 2 cats, and 1 slob (me) have taken their toll on our poor carpet. We hope to eventually put in hardwood floors but thought we would try to delay this by trying the carpet cleaning route.
I have to say that the tech was able to remove EVERY single horrible stain in our house. The carpet looked brand new. It was chemically treated and came with a warranty that is good as long as we still have the carpet in our house.
I was very pleased with the price and extremely pleased with the service. They serve the Middle Tennessee area and I highly recommend them to everyone needing this service.
Thursday, March 25, 2010
Wednesday, March 24, 2010
Old Caulk Begone!
One thing leads to another
Last Friday was sunny and warm. When I got home from work, I decided to get a jump on my Frostbite work. Remember, I had planned to recaulk the roof this weekend. I started scraping off the old caulk on the room seam and edges and it came up pretty easily. Stepping back to admire my work, I realized that the "roof" actually came down about a half foot on the edges and the seams on these edges were in rough shape. No offense to the previous fix-it guy but it honestly looked like it was caulked by a caveman with his bare hands.
No problem. Armed with my scraper, rubber gloves, denatured alcohol, and some rags, I set to work. I quickly realized that this was going to be much tougher than I initially thought. I decided to improve my arsonal by getting a plastic brush like those used to clean dishes.
A little better but not much.
I increased my arsonal again. I had previously purchased some small wire brushes about the size of tooth brushes at Big Lots for $1. I had much better success. Working diligently, I managed to clean about six inches worth of caulk on the front seam. Unfortuntely, when I checked my watch, I realized that it had taken me a half hour to do this. It was getting dark so I decided to sleep on it.
The next morning I had a better idea.
I opened a large wire brush, again purchased at Big Lots, and managed to double my progress. I had originally gotten these wire brushes so I could scrape the rust off the frame before I painted it. After an hour or so, I needed a break and decided to visit my go-to girl at the local hardware store to see if there was any goo that was stronger than what I was using. I described my problem to her and, as usual, she didn't let me down. She suggested I get one of these:
At $3.50 each, I bought two
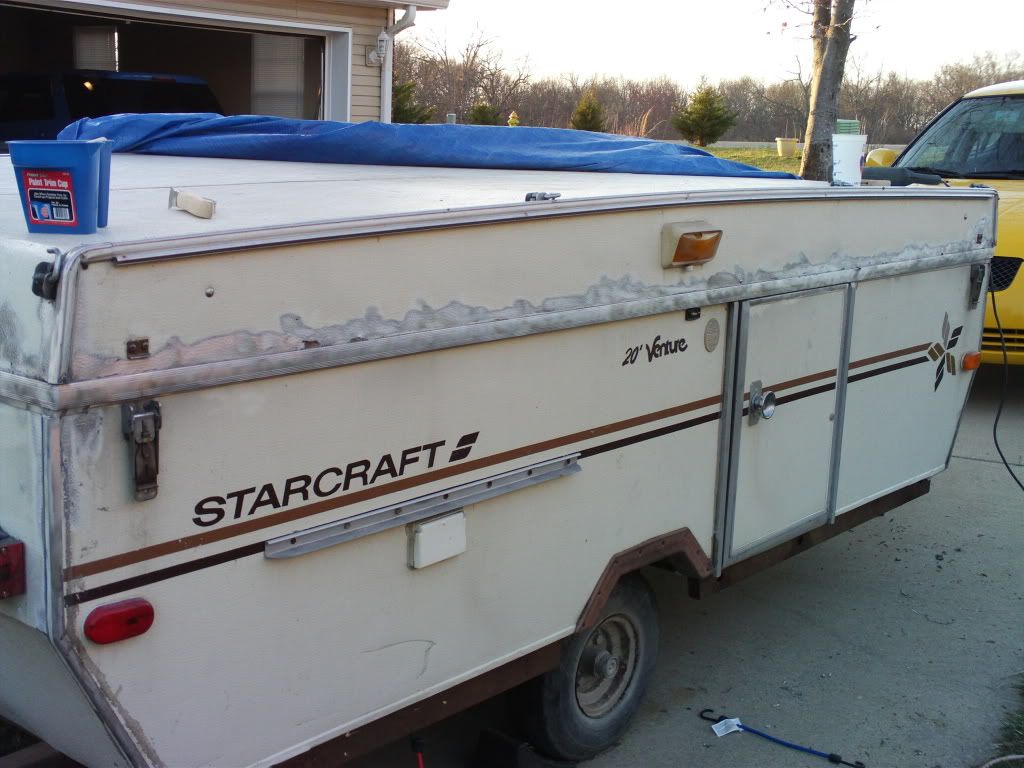
The drill is mine. I'm referring to the wire brush attachment attached to it. NOW I was cooking with gasoline! Haha! Man, this thing not only removed the caulk but it shined the metal stripping so that it looked brand new. Yes, it removed the paint also but that doesn't matter as I intend to repaint anyway. I am very, very pleased with the result. Here is a before and after pic of the back end:
Before
After
Now I realize to the "untrained" eye, it might look like I simply spray painted silver paint on the edge but, trust me, I didn't. The metal edge is shiny and new and you can see every groove clean as a whistle. Here is a closer view:
This was no easy feat as I am still working on it. However, I finished the back end and one of the sides yesterday afternoon after work. Here is a pic of the door side of the camper:
Again, I realize to the untrained eye that this is not beautiful just yet. However, if you can picture new, even caulking along the edges and a shiny new while paint job, you will realize that this is just the first step towards a thing of beauty.
I hope to finish removing all the caulk the next couple of days now that I have about 3 hours of sunlight in the afternoons after work. With that job completed, I will recaulk all the edges and seams of the roof which *should* have already been done but, as I've discovered with Frostbite, one thing almost always leads to another.
Monday, March 22, 2010
Dogs and Fish Don't Mix
Saturday was *almost* wonderful. It didn't get quite as warm as advertised but it was sunny and rain free. I did get a heap of work done on Frostbite. I knew that it was supposed to rain on Sunday but it was supposed to be "scattered" showers so I thought I would be able to finish the work and take pictures on Sunday.
Sunday morning @ 7:00AM it was already starting to rain. I managed to get the tarp back on Frostbite. I didn't not actually get to caulk the roof fortunately since it would not have had enough time to set before the rain anyway. I'll describe what I did do to Frostbite in another post when I get some pictures.
The rain was hard and steady ALL DAY so further work on Frostbite had to be postponed.
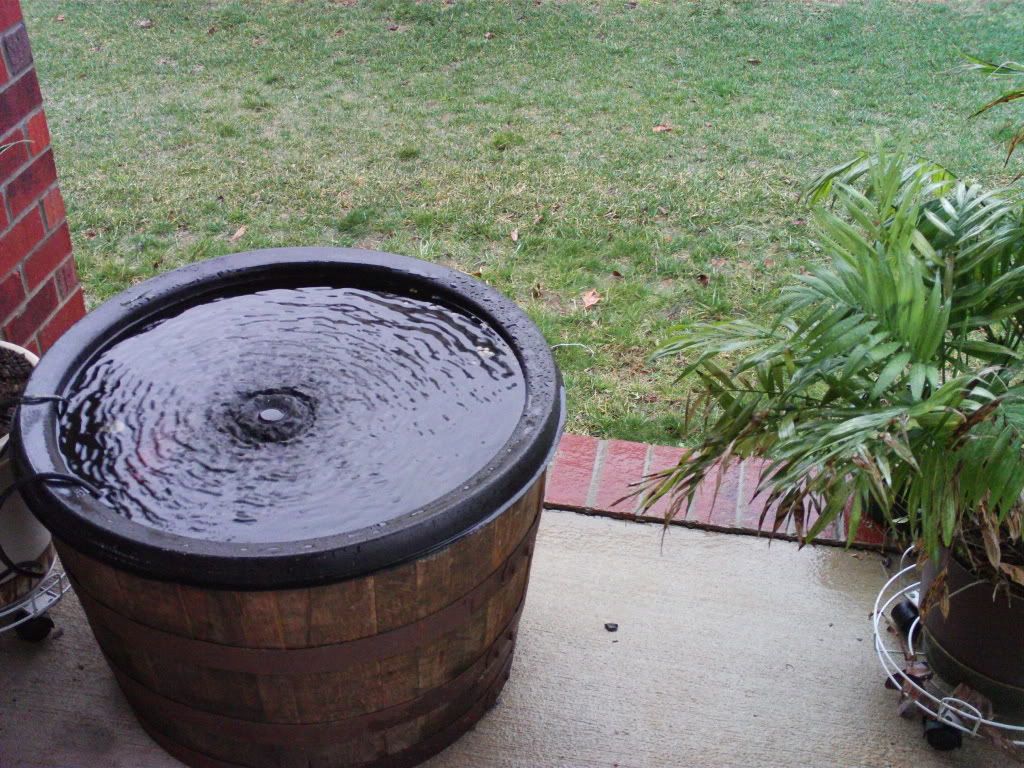
Nevertheless, there was another project I had been putting off for better weather. We decided to move our deck pond from our covered back deck to the front porch. We have a half whisky barrel that has a liner and some fish in it. The fish are outside fish and the tank runs outside year round. We've had this little pond for about three and a half years on our back deck and everything was fine.
Last year we got another junkyard dog, a Sheltie. The current junkyard dog, a Mutt, did not bother the deck pond at all. The new one, however, was obsessed with it. She continually chewed up the air hoses, pulled out the heater, and knocked around the fountain attached to it. All this despite us putting up a physical barricade of chairs and other objects around it which, of course, ruined the visual beauty of having the thing in the first place. This weekend she managed to pull out the main filter and chew it up.
It was starting to get expensive.
We decided it was time to move the pond to the front porch and out of the reach of curious little knucklehead mutts. This is actually a little better location as it will get a little more sun and we can grow some water plants in it and arrange some plants around it. When we got the new dog, we quickly learned that we couldn't keep plants within her reach either.
We made a trip to Lowes to get new equipment. I managed to scoop the fish up into a large bowel. We originally populated the tank with feeder goldfish three years ago and some of them have gotten quite large. I emptied the water, cleaned the rocks, moved all the stuff to the front porch and set the tank up again. All this was done while it was pouring rain outside. Our front porch is fairly large and covered but, at times, the rain blew in and drenched us since the wind was raging pretty good.
Despite this, I think it turned out pretty well.
Sunday morning @ 7:00AM it was already starting to rain. I managed to get the tarp back on Frostbite. I didn't not actually get to caulk the roof fortunately since it would not have had enough time to set before the rain anyway. I'll describe what I did do to Frostbite in another post when I get some pictures.
The rain was hard and steady ALL DAY so further work on Frostbite had to be postponed.
Nevertheless, there was another project I had been putting off for better weather. We decided to move our deck pond from our covered back deck to the front porch. We have a half whisky barrel that has a liner and some fish in it. The fish are outside fish and the tank runs outside year round. We've had this little pond for about three and a half years on our back deck and everything was fine.
Last year we got another junkyard dog, a Sheltie. The current junkyard dog, a Mutt, did not bother the deck pond at all. The new one, however, was obsessed with it. She continually chewed up the air hoses, pulled out the heater, and knocked around the fountain attached to it. All this despite us putting up a physical barricade of chairs and other objects around it which, of course, ruined the visual beauty of having the thing in the first place. This weekend she managed to pull out the main filter and chew it up.
It was starting to get expensive.
We decided it was time to move the pond to the front porch and out of the reach of curious little knucklehead mutts. This is actually a little better location as it will get a little more sun and we can grow some water plants in it and arrange some plants around it. When we got the new dog, we quickly learned that we couldn't keep plants within her reach either.
We made a trip to Lowes to get new equipment. I managed to scoop the fish up into a large bowel. We originally populated the tank with feeder goldfish three years ago and some of them have gotten quite large. I emptied the water, cleaned the rocks, moved all the stuff to the front porch and set the tank up again. All this was done while it was pouring rain outside. Our front porch is fairly large and covered but, at times, the rain blew in and drenched us since the wind was raging pretty good.
Despite this, I think it turned out pretty well.
We are going to place some of our plants around it on stands and get a few water plants growing inside it. Come spring it should look really nice.
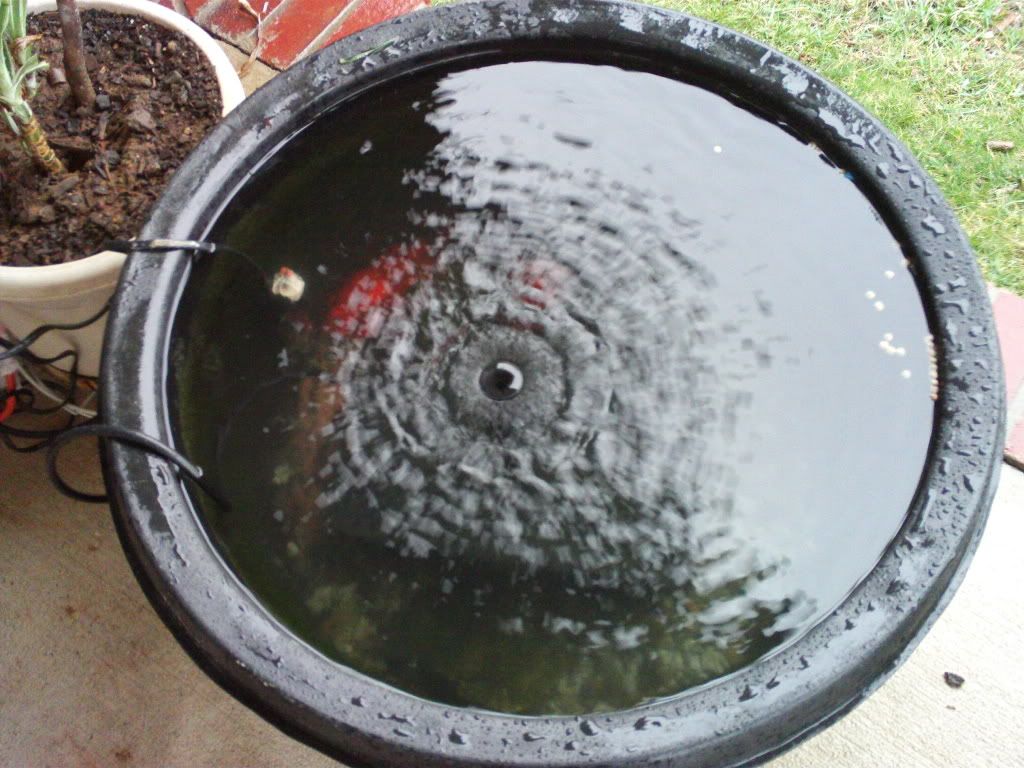
I tried to get a picture of our fish but it was cloudy out and they were hard to see. I'll post another pic once we get it landscaped a little better. Here you can just make out one of the large goldfish. There is another white fish that is larger but he is not visible in the photo. The smaller goldfish were also out of site among the large rocks at the bottom.
We also took all of our plants outside that were "wintering" inside the house so they all look a little rough. Probably did this too early as another freeze is inevitable before the Spring is over but they will do better in the long run since they get sort of neglected by us inside. If I have to move all of them into the nook of the front door prior to a cold night, so be it.
A productive Sunday but no work on Frostbite today and I was unable to get pictures of yesterday's work. I'll tackle that later this week when the weather gets better.
Friday, March 19, 2010
Another great weekend coming!
Should reach into the 70s today and tomorrow here in TN. I'll have no excuse to fall back on for not working on Frostbite tomorrow.
My plan of action is this:
1. Caulk the seam and edges around the roof.
2. Remove one of the brake lights and attach the gizmo that holds a license plate which I neglected to do when I first installed it.
3. Caulk around the new outside lights.
4. Paint the inside ceiling and side walls with my nifty new paint sprayer.
Why, you might ask, am I going to do work on the inside when I know the roof still leaks?
Because I'm completely and stupidly confident that re-caulking the entire roof will fix the problem.
. . . at least it better. I don't have any more tricks up my sleeve for that one.
Moving ahead blindly as usual.
Thursday, March 18, 2010
Well, This Sucks
Despite my doctor's appointment which involved minor surgery and three stitches, I managed to open up Frostbite to check for leaks.
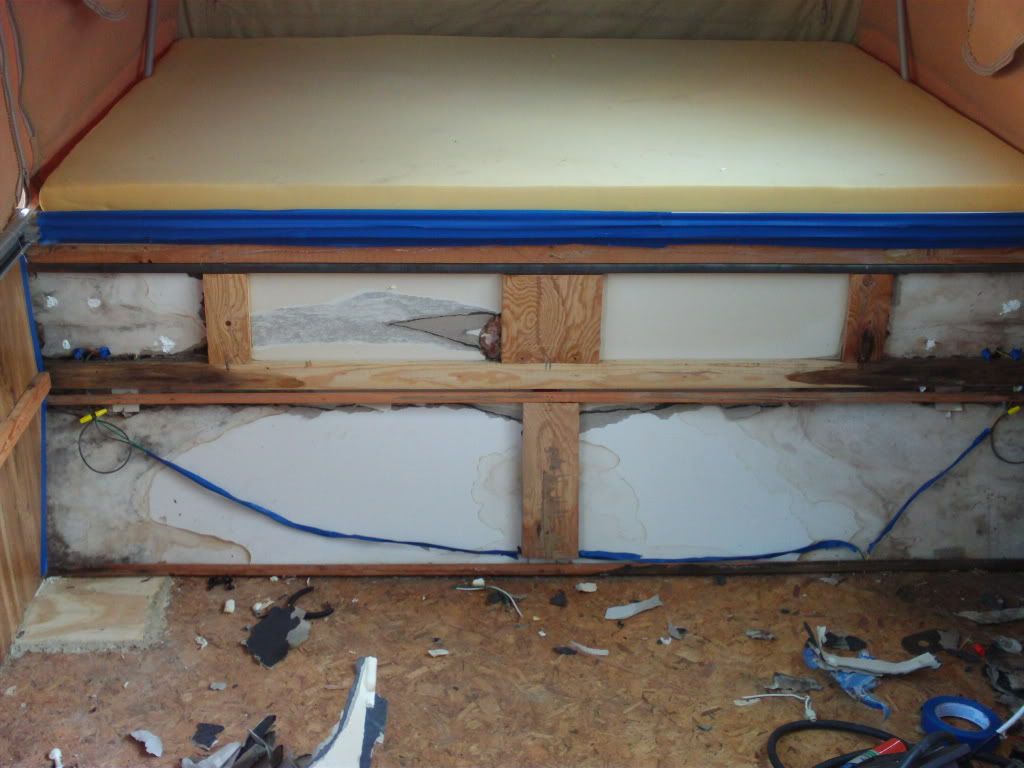
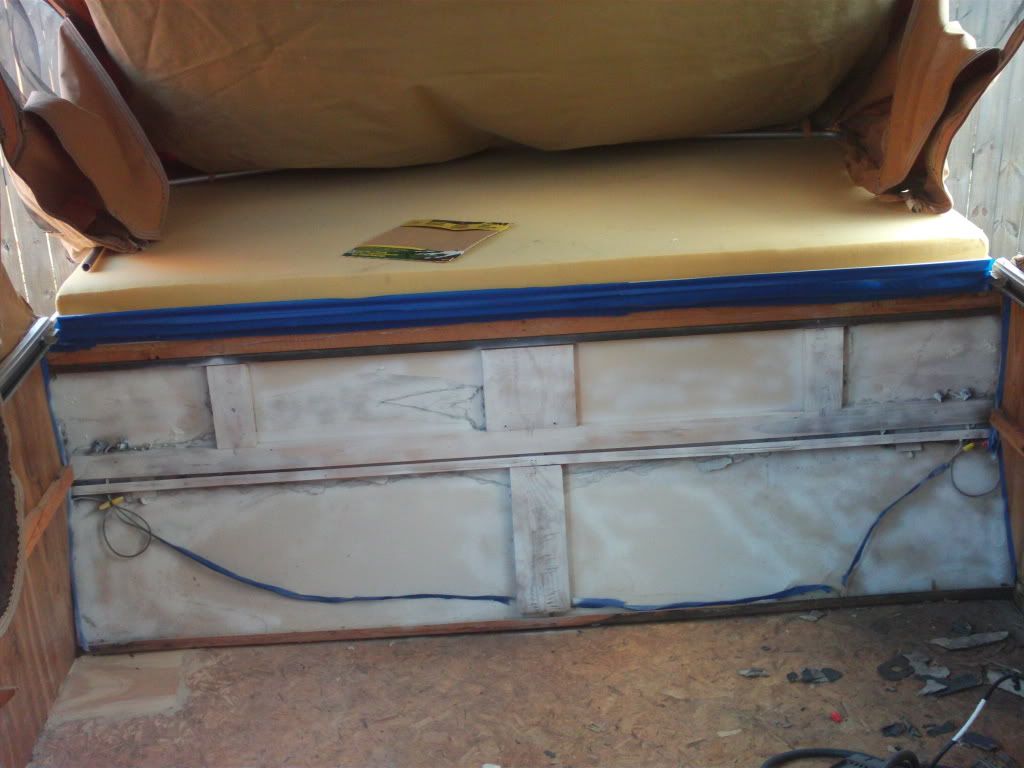
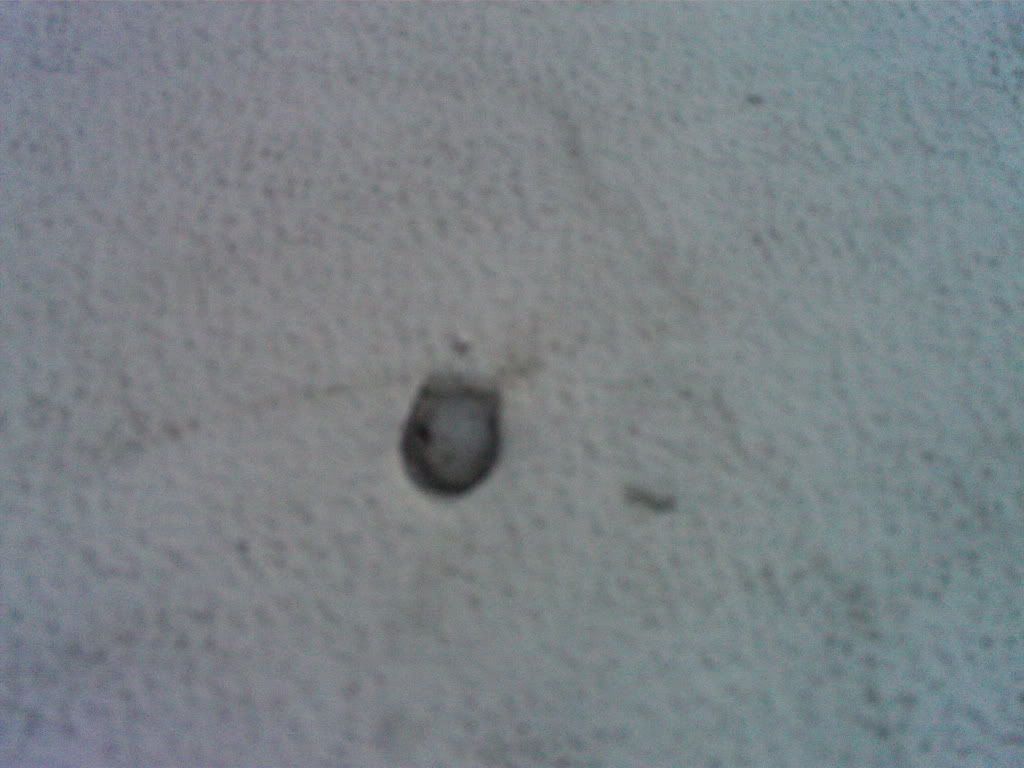
I found this on one bunk:
And this on the other:
My plan of action for this weekend is now going to be recaulking this entire area. I'll wait for another rain, which won't be long I'm sure, and hopefully get better results.
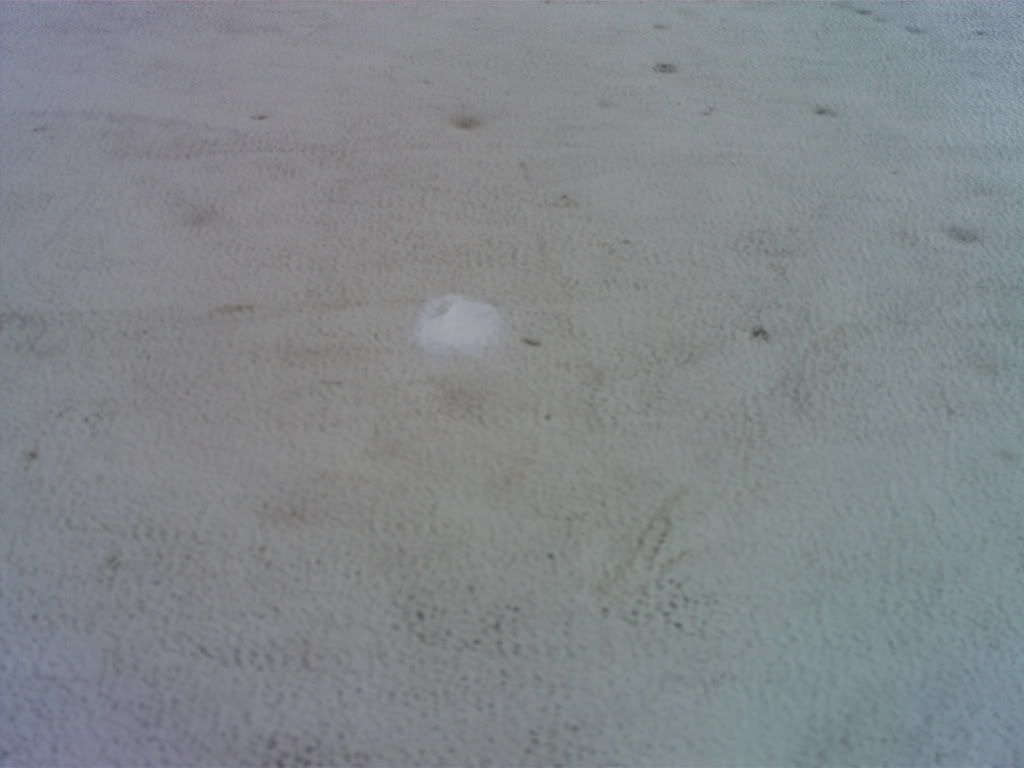
I found this on one bunk:
And this on the other:
And this on the floor:
Now this leak is still in one place I figure. Frostbite was down and the bunkends were pushed in so it only appears to be in three different places. I suppose it could be much worse. Remember that we had 2 or 3 days of thundershowers not just a little Spring rain.
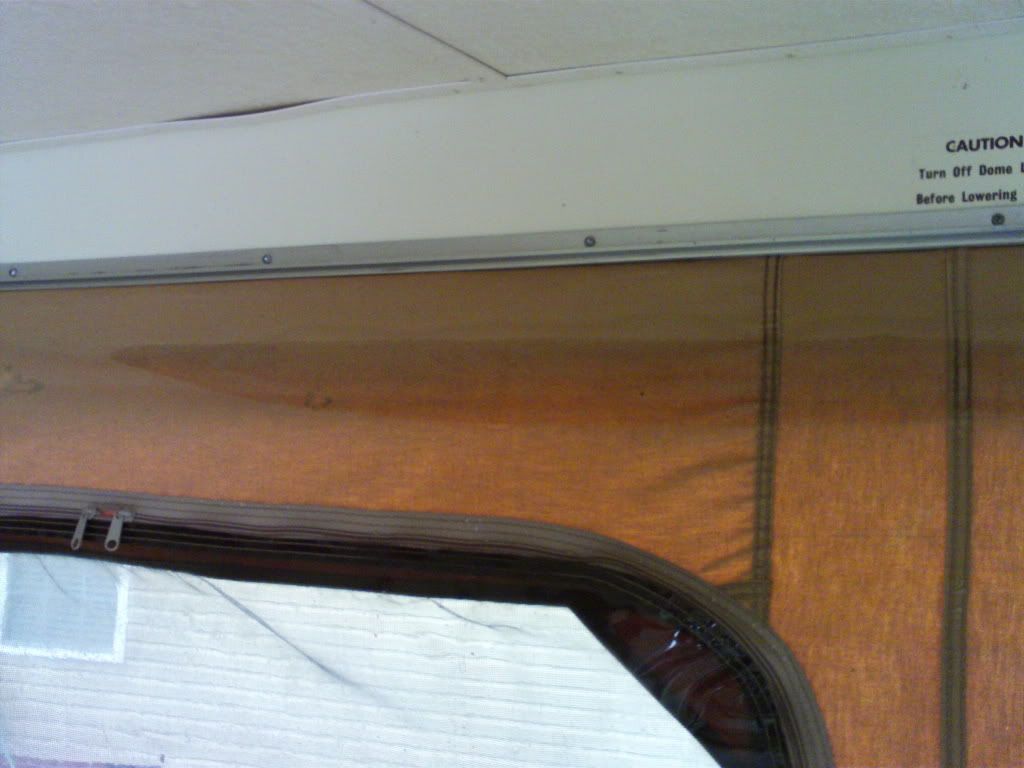
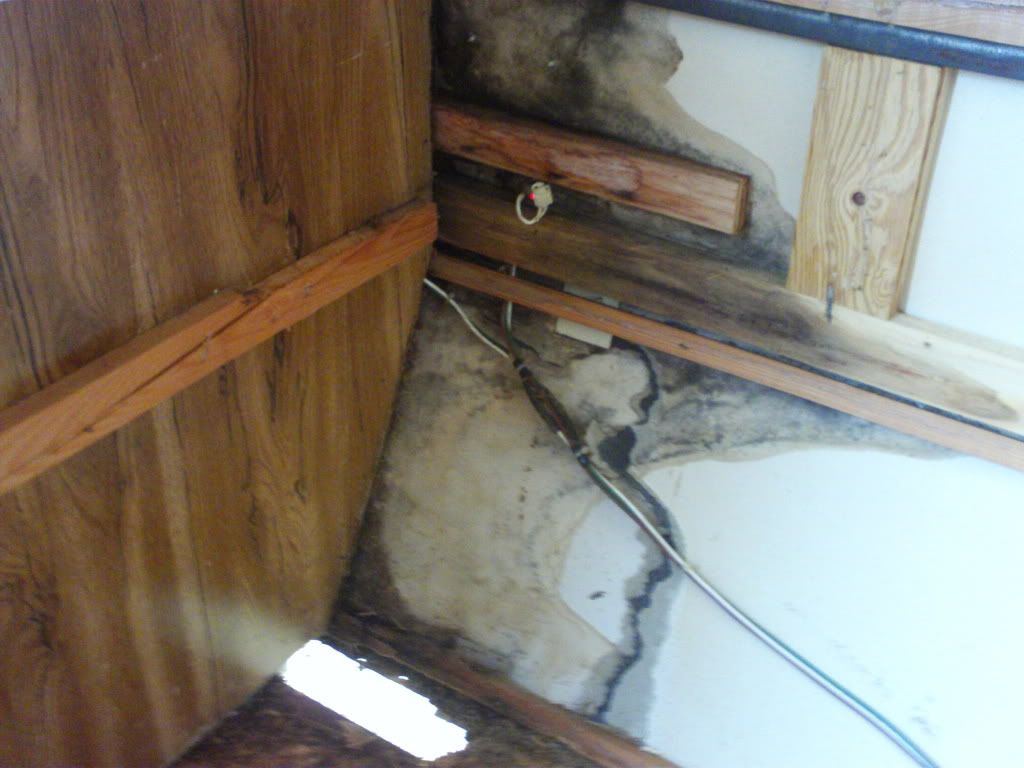
I examinted the inside ceiling very closely. The vent was dry inside and around it. All the edges and seams above that area were also dry to the touch. In fact the entire ceiling was dry and I couldn't find any water damage like discoloration so I *hope* that it hasn't been leaking long. There was a spot on the upper canvas wall that was wet.
It was obviously the middle man for the roof leak but, despite my efforts, I was unable to locate where in the roof the water came from to get the canvas wet here. I did notice that the leak was on one side of the camper probably due to this:
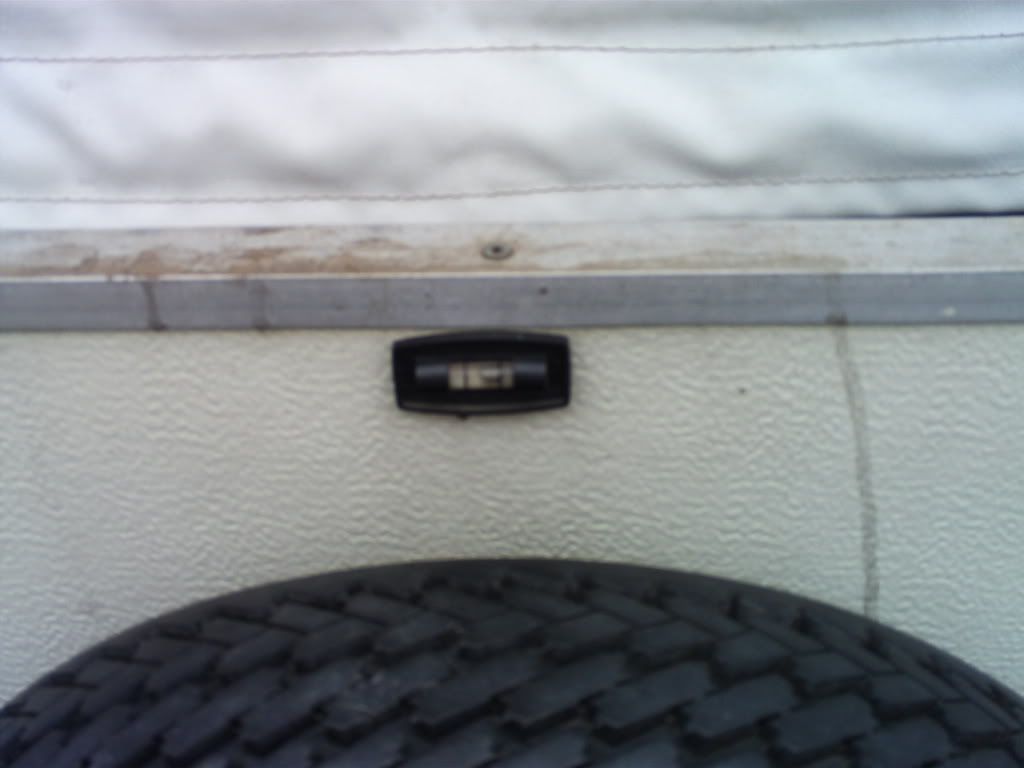
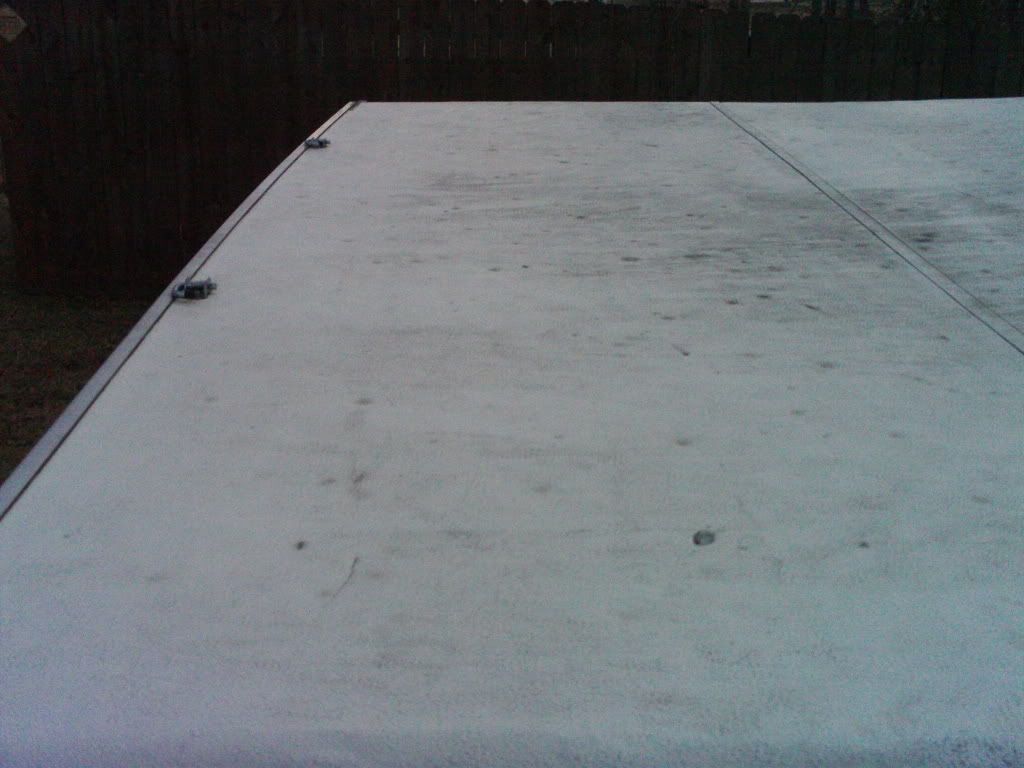
As you can see here, the camper is not level side to side and the leak was located over the low side. I examined the outside where the canvas meets the roof.
It was dry to the touch all along the edge where the canvas attaches to the roof. I did not see any type of "gasket" nor did I see any evidence of there ever being any type of gasket here. There was no hardware that I could identify onto which a gasket could be attached. I figure this couldn't be the source of the leak anyway since it is unlikey that water entered here underneath the edge of the room.
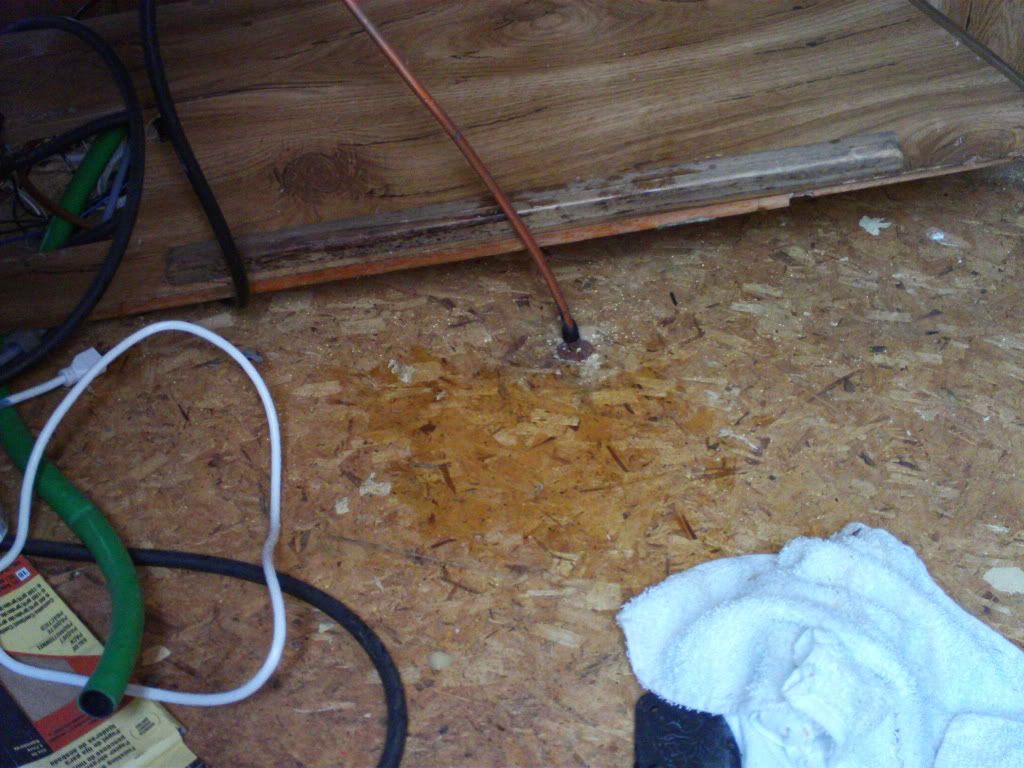
No, the leak has to originate somewhere on here:
I've already fixed that hole you see here.
It's no good to patch the ceiling anyway since the roof itself is getting water into it. THAT is what has to be addressed. In the above pic you can see a seam going down the center of the roof. Why did they put a seam down the middle of the damn roof? Anyway, the caulk is old (black), cracking, etc. The caulk along the edges of the roof is in the same condition.
I'd like to think that the repairs I've already done on the roof contributed, at least a little, to limiting the leak.
My plan of action for this weekend is now going to be recaulking this entire area. I'll wait for another rain, which won't be long I'm sure, and hopefully get better results.
Wednesday, March 17, 2010
I'm not lazy even though it seems that way
I made great strides on Frostbite the weekend before last and since then, nothing much. I realize that post after post of me not doing anything sure makes it look like I'm lazy. In my defense, the weather has turned crappy again. It's not nearly as cold as a month ago but, compared to the last good work weekend I had, it feels like winter has returned. It's been cloudy, chilly, and the wind has been blowing fairly hard; a combination that doesn't motivate me to work outside on Frostbite.
Also, It seems that my birthday post this week has unintentionally prompted my online friends to insist that I go see a doctor. I bent to the peer pressure and have an appointment this afternoon for what promises to be an embarassing and equally uncomfortable procedure.
I fear that my future birthdays will be heralded in by some sort of invasive probing intended to measure the extent that I am falling apart.
In short, no, I didn't pop up Frostbite yesterday to check for leaks. My wife tells me that Saturday should be a nice sunny day. Sunday, however, will turn cold again dangit!
Tuesday, March 16, 2010
Nope, Still Too Cold
Yesterday afternoon was still fairly miserable so no popping up Frostbite. I will try hard to get inside her this afternoon at least to see if there were any leaks from last week's thunderstorm. If I wait too long, they might dry up and I won't notice them.
Stupid weather.
Stupid weather.
Monday, March 15, 2010
I Done Got Old
In the words of the great delta bluesman, Robert Balfour:
I done got old.
Can't do the things I used to do.
I turned 41 this past Sunday and it got me thinking. I'm not one of those folks who dread birthdays. I am really not bothered by age at all. However, turning 41 has unexpectedly been lot different than turning 40. I can say that I've starting to notice some things in my life that are harbingers of my oncoming geezerdom.
Toilet Paper Appreciation
This is something I have historically never really cared about. When I first lived on my own, I always just bought the cheapest and wondered why folks wasted their money on a product that is so, needless to say, very disposable.
However, when my wife and I were at K-Mart yesterday picking up some house supplies, I decided to get the most expensive pack of Charmin toilet paper they had on the shelf. I realized then for the first time that the older I get, the more money I'm willing to invest in toilet paper.
The Urge
In the mornings, I pour coffee in a travel mug to drink while driving to work. I really don't have any type of addiction of coffee. I can truly take it or leave it. To be honest, I have never noticed any physical effect of drinking a cup of coffee. I have just gotten in the habit of taking a cup with me on the drive to work for something to do.
I have noticed this past year that pouring the coffee from the pot into my travel mug give me a strong urge to urinate.
Even more startling was the realization a few minutes later in the bathroom that this urge occurs even when I don't have to actually urinate.
I mean, how much longer before I skip the strange urge-to-pee stage and just start peeing my pants whenever I pour a cup of coffee?
Let the Good Times Roll . . . away
I used to drink a lot more beer on the weekends. I realized this morning that I haven't had a beer at all this weekend. It's not like I'm trying to cut down or anything, not like it wouldn't be a good idea, but I honestly didn't think of it.
Hair in Strange Places?
We took our daughter to get her hair styled on Saturday and, since I was already there, I decided to get my hair cut as well. Now I'm not losing my hair at all. I don't even have a receding hairline. It's not something I brag about since I don't really care but I must have good genes in that regard.
So the stylist, who I have never even met before, worked on my hair and at one point spent what seemed to me to be a longer than usual time with the clippers around my ears. She said "Yep, you're getting older." Older? She had never cut my hair before so she couldn't be comparing me now to sometime in the past. What prompted this?
I'm still not 100% sure but it's probably not good.
They Don't Make Good Music Anymore
They sure don't. Seems that any old skank willing to dress like a hooker and dance like a pole stripper can have a hit record. Any bozo that looks like he just got up from bed after passing out drunk the night before and is still able to hold a guitar can perform on TV and sell records. Who thinks not combing your hair is cool? Why can't entertainers have last names anymore? Come on, even the King had a last name even though "Elvis" was more than enough to identify him.
What happened to actual bands? Seems that nowadays the spotlight is just on a single moron singing alone and the folks who actually wrote the songs, play the instruments, and make the music aren't even on stage.
What happened to the rockers from the 70's who, despite being drugged out of their minds, could still sing well and play guitar like nobody's business? Man, those were the good old days! Except for a few exceptions, they stopped making good music sometime in the 80's.
The End is Near
How much longer before I show up at Cracklebarrel at 3PM for dinner in my adult diaper in case I pee my pants when they refill my tea?
Move over geezers. I think I'm getting ready to squeeze my way in at the geezer table.
My List of Excuses
OK, First off, I didn't do any work on Frostbite this weekend and I have a nice list of excuses I'm going to use to explain why not.
1. It was cold. It was raining off and on. Enough said.
2. Saturday morning I decided in the spur of the moment to install Windows 7 Professional on my personal development laptop. This actually wound up taking me all weekend to complete. I didn't work on this non-stop as the family did other things throughout the weekend but it was always "in-process" until Sunday evening.
3. Sunday was my birthday. It's not a major holiday around here or anytning but I took the family out to eat on Sunday and, to be frank, I didn't feel like getting outside in the cold and wet. Computer work was much more enticing this weekend.
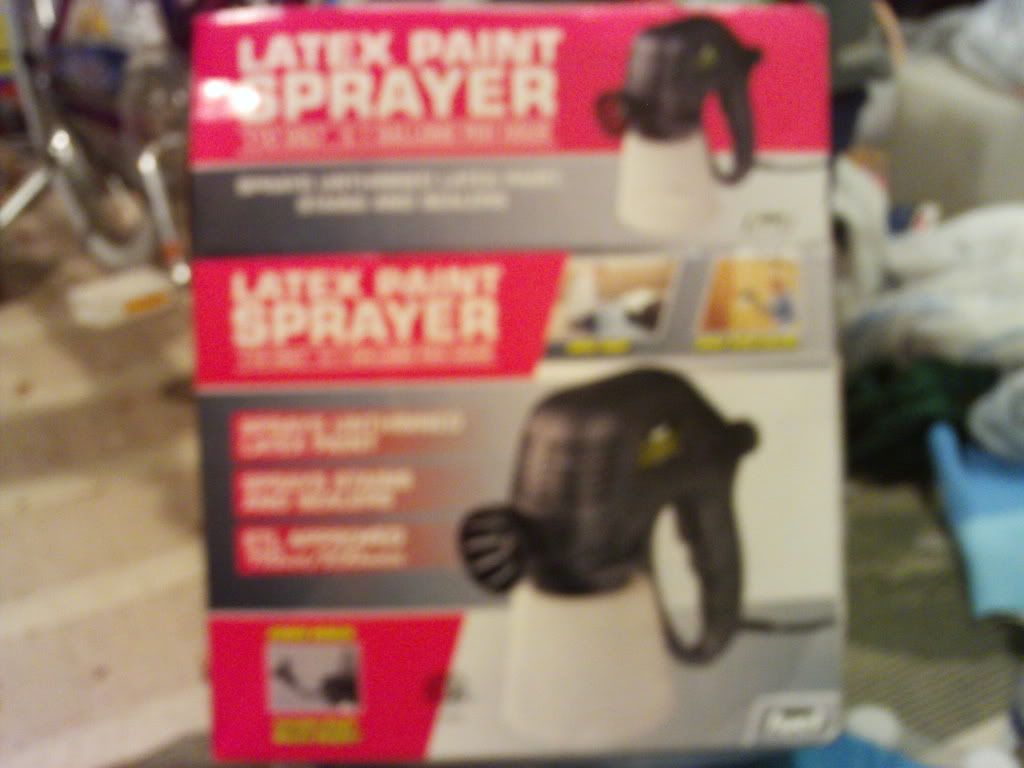
However, the one thing Frostbite-related I did this weekend was my decision to get one of these:
1. It was cold. It was raining off and on. Enough said.
2. Saturday morning I decided in the spur of the moment to install Windows 7 Professional on my personal development laptop. This actually wound up taking me all weekend to complete. I didn't work on this non-stop as the family did other things throughout the weekend but it was always "in-process" until Sunday evening.
3. Sunday was my birthday. It's not a major holiday around here or anytning but I took the family out to eat on Sunday and, to be frank, I didn't feel like getting outside in the cold and wet. Computer work was much more enticing this weekend.
However, the one thing Frostbite-related I did this weekend was my decision to get one of these:
To heck with "old school"
I found it at good-ole Fred's for $30. I also got a gallon of white semi-gloss and some paint thinner for cleaning it. Now that daylight savings time has hit us, I hope to get inside Frostbite after work this week and paint the ceiling and box walls.
Assuming it warms up and stops raining.
Stupid weather.
Friday, March 12, 2010
What do you expect for .96 cents a can?
I suppose this is a case of "you get what you pay for." I have been talking about painting the inside of the back wall for weeks now. It's not really a priority because it will be soon covered by insulation and then by paneling. However, I wanted to cover the water stains that were on the aluminum skin.
I even bought some whitish paint to do just this but now that money is a little tight for a couple or three weeks I didn't want to waste it on the inside wall but rather on the ceiling which needs to be repainted before I put down the new floor.
During my supply run to wal-mart a few weeks ago to get paint and goo and such, I picked up 4 cans of white spray paint. Hey, it was .96 cents a can! It was intended for quickie, just-in-case repairs as needed. I decided to spray paint the inside wall instead of using regular paint.
First I prepared the area and used painter's tape to cover things I didn't want to be painted. I even taped up the wires so the color codes wouldn't be hidden.
I then set out to work spraying away. I soon stopped and opened as many windows as I could since the camper immediately filled up with toxic fumes.
That done, resumed spraying and noticed that the coverage wasn't very good. In fact, I used the entire spray can.
It looked better when I was still stoned on paint fumes.
I know it's not beautiful but close enough for government work. Soon I'll remove all the painter's tape, install some thin insulation, and then cover that with nice paneling so it will never be seen again.
Note to self: .96 cent spray paint works fine as long as you are painting something that will never see the light of day.
Mice, Snakes, and Lights
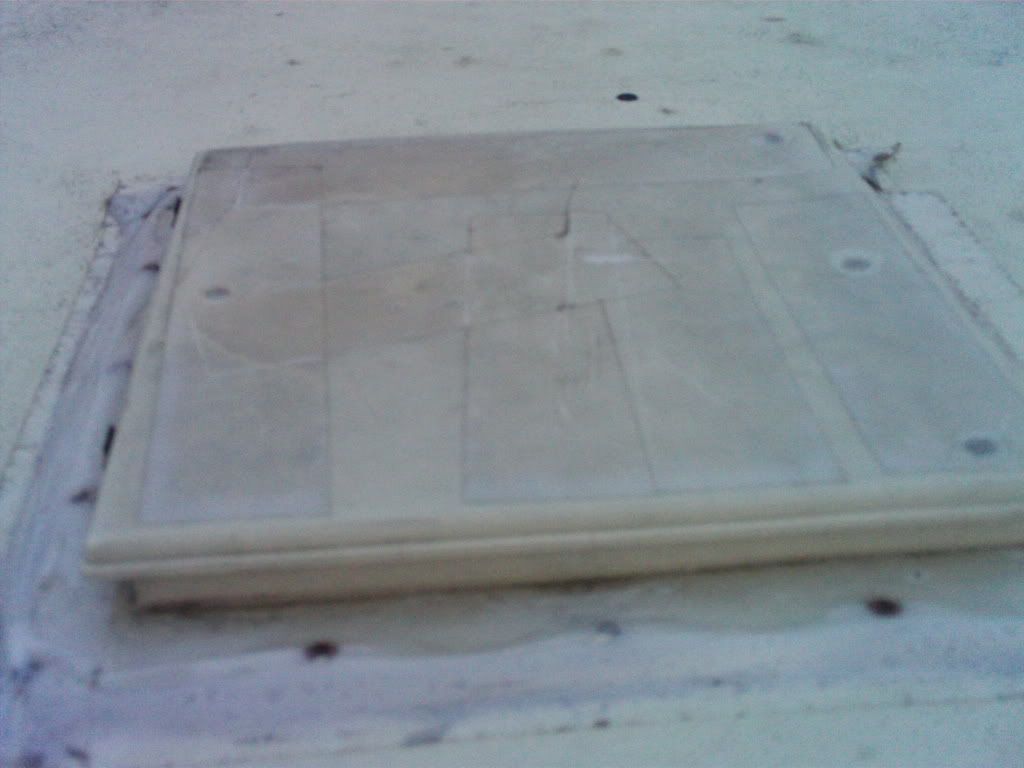
This fix was an easy one. I tackled the ceiling lights inside the trailer. Here is a before pic:
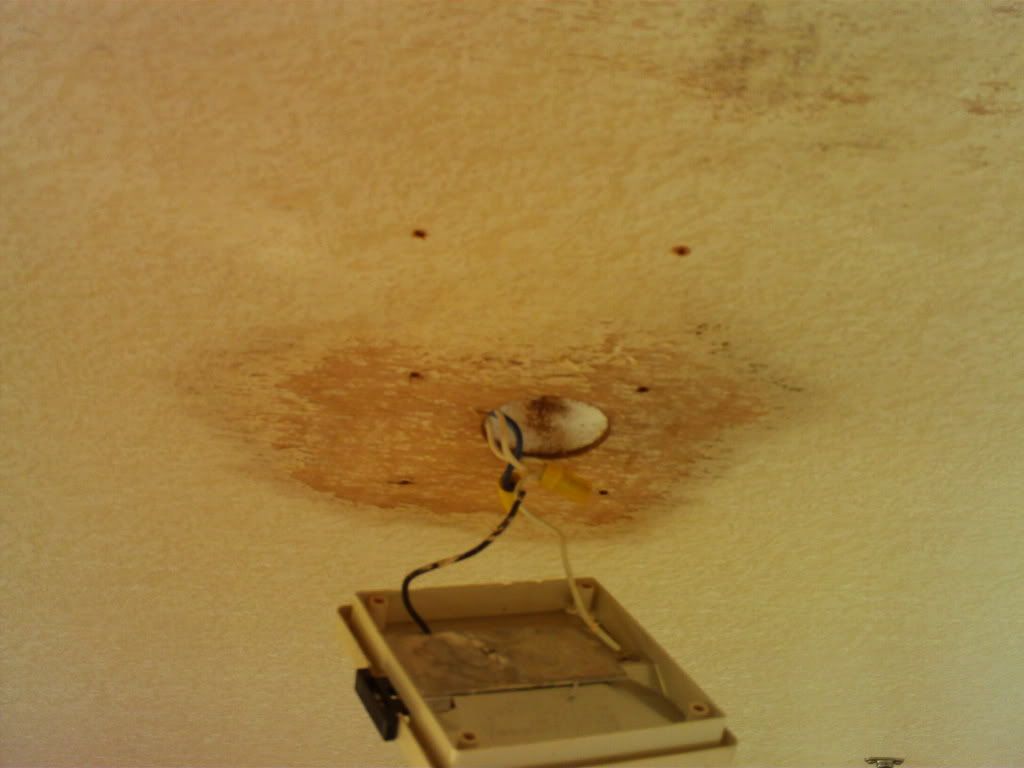
Notice that there are six holes in the ceiling instead of four, which is all that is required for the light to be attached. As you can imagine the light is *supposed* to be attached via the four holes that allow the light to cover the hole where the wires go into the roof. It turns out that 2 of the far holes are stripped so someone prior to me simply drilled two new holes on the other side of the hole and attached the light there.
Now I can appreciate the simplicity of this fix. It's something I, myself, would have thought of. However, it did leave the large hole uncovered which is sort of ugly to say the least.
I dug around in my large tool box, which was an adventure in itself, searching for some screws that were larger than the screws already used in the light hoping that they would fit in the stripped holes. Now my toolbox is huge, it has wheels on it so it can be tugged around. I'm confident is saying that I have never cleaned it out since I bought it some 10 years ago. Mainly because I didn't use it except to dump things in it.
Digging around in it I discovered that it had apparently been home to generations of mice over the years and, unfortunately for the mice, at least one snake since I found a discarded snakeskin at the bottom which was a bit unsettling since I've only stored this toolbox inside the house or in the garage.
I made the mistake of sharing this info with my wife a couple of days later. In hindsight, my comment, "Well, you can't blame them for moving in there. With all the loose insulation and rags at the bottom, I'm sure it was comfy and warm," wasn't the best thing I could have said.
It could well be that the snake *took care* of the mice so to speak. If I can somehow attract some critter into the toolbox that eats snakes we'd be fine.
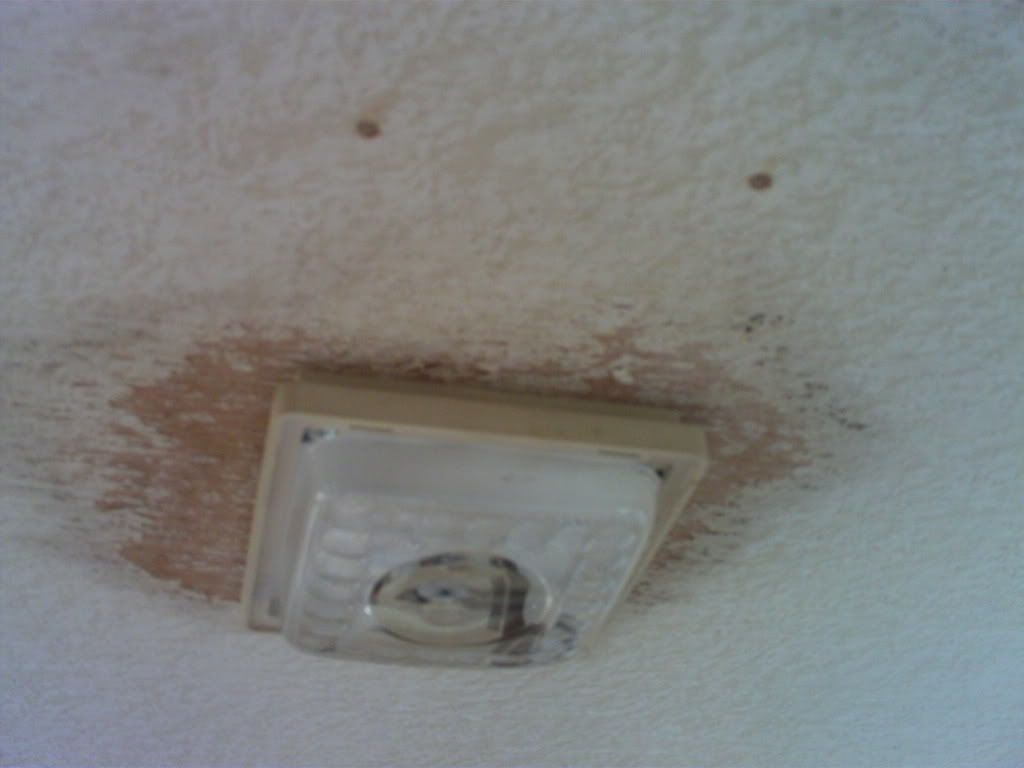
Nevertheless, I did manage to find four matching screws that happened to be the right length. I reattached the light and filled the 2 extra holes with wood filler.
Pretty Snazzy!
I thought this to be a perfect fix until I tried to attach the door to the roof while getting ready to lower the camper. The light cover kept the door from folding flush against the roof. I wondered it this was another reason to reattach the light to the right of it's original placement. That's couldn't be right, though. This was obviously where the light was meant to be attached.
I popped off the plastic light cover and the door attached to the roof perfectly. Maybe this is the way it is supposed to work? Who knows? It's not too much trouble to do. I'm fairly sure these are the original lights too since most everything else in this camper is original. They sure don't look fancy or new.
Reattaching the light cover (It just pops in and out) will just have to be one of those things involved with setting up and taking down the camper. It can be stored in a cabinet when the camper is packed up. I'm fine with that.
I can't explain why the paint is missing around the light. The other light has the same bare spot around it as well. It doesn't matter much though since I will be repainting the roof anyway.
In fact, I plan to do this on the upcoming weekend BEFORE I put down the new floor for obvious reasons. I had hoped to get one of those electric paint sprayer gizmos thinking it would work better than my current paint brush method but money is a bit tight and I need to get the roof painted so I can continue with this project. I'll be doing this job, old school.
BTW, I've never painted a ceiling before. Should be fun stuff.
I suppose I should add cleaning out my tool box to my list of things to do at some point.
Thursday, March 11, 2010
Not Without Spilling Some Blood
As I mentioned in an earlier post, I am a software developer. This is a job where it is difficult if not impossible to physically hurt yourself while doing it. So far, I have managed to be 100% accident free my entire career as a designer and programmer.
However, another percentage that I'm not as proud of is that I have managed to wound myself nearly 100% of the time whenever I do most any task that is not software development. The combination of tools, especially power tools, and physically working with my hands almost always result in spilled blood.
Thankfully, most of the time it is just my blood.
Now I intend for this blog to be full record of my efforts with this project so that "full record" would have to include my painful misadventures as well.
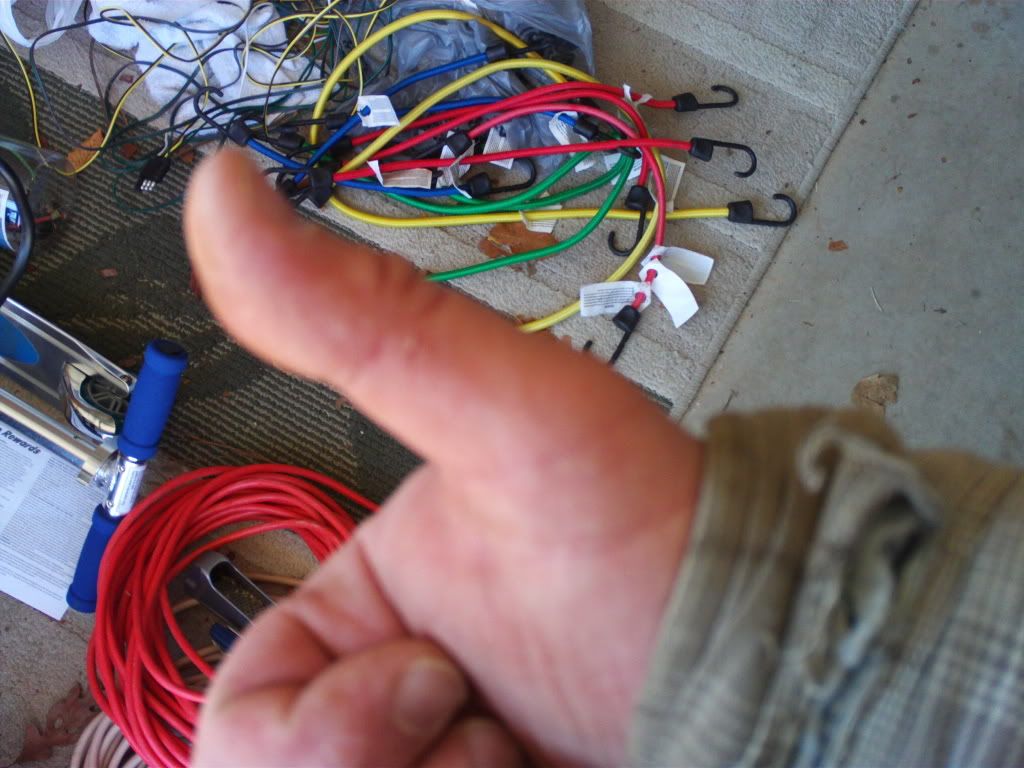
All in all, this weekend was a success in that I still have all my fingers and, I hope, no permanent disability. The first accident occurred while trying to get the stupid safety hook off of the trailer. In hindsight, laying cramped underneath Frostbite trying to manipulate a pair of pliers in one hand and a socket in the other in an effort to loosen a rusty bolt surrounded by sharp rusty edges of metal was a recipe for disaster.
However, another percentage that I'm not as proud of is that I have managed to wound myself nearly 100% of the time whenever I do most any task that is not software development. The combination of tools, especially power tools, and physically working with my hands almost always result in spilled blood.
Thankfully, most of the time it is just my blood.
Now I intend for this blog to be full record of my efforts with this project so that "full record" would have to include my painful misadventures as well.
All in all, this weekend was a success in that I still have all my fingers and, I hope, no permanent disability. The first accident occurred while trying to get the stupid safety hook off of the trailer. In hindsight, laying cramped underneath Frostbite trying to manipulate a pair of pliers in one hand and a socket in the other in an effort to loosen a rusty bolt surrounded by sharp rusty edges of metal was a recipe for disaster.
Fortunately the gash was right in the crease of my thumb and, once the bleeding stopped and the rust was washed away, you can hardly even see it. Save for the lingering, throbbing pain, I can hardly notice it.
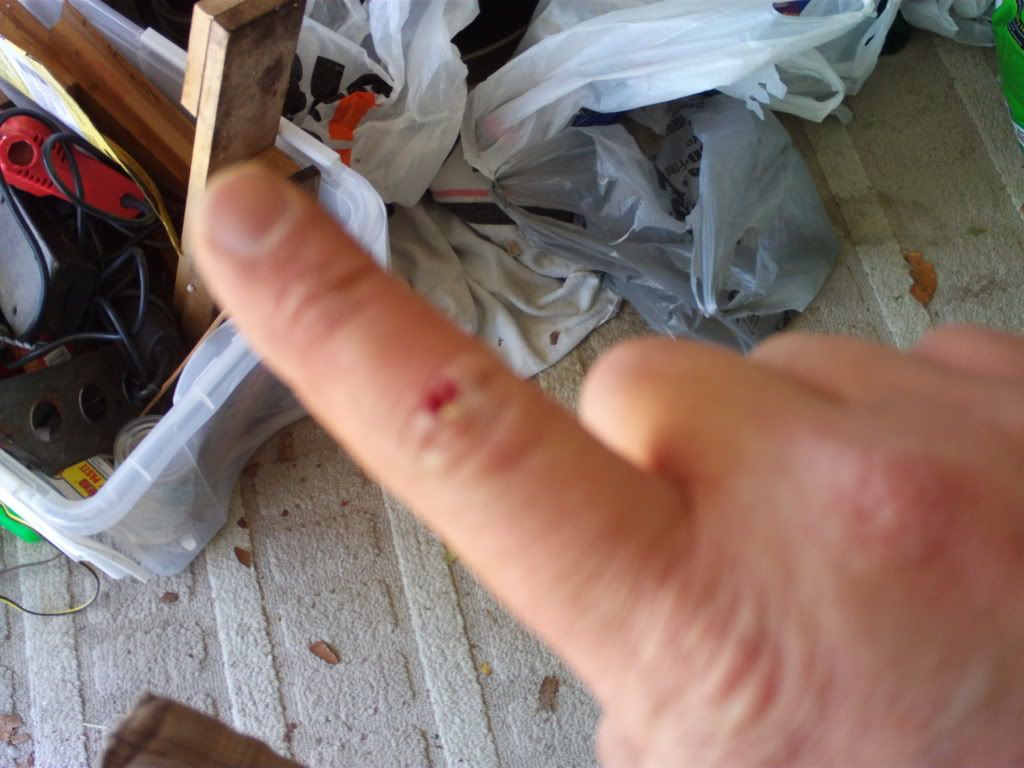
Now in order for me to get underneath Frostbite, I had to raise the tounge up a good bit (insert fat joke here). Once I managed to get the safety hook back on, I was anxious to test it out. I lowered the tounge until it *seemed* about right and started cranking up the roof.
Which resulted in this:
Of course, I had lowered it too much and, upon the very first crank, my finger scraped the concrete of my driveway like a cheese grater. Once I stopped the bleeding and cleaned out the rocks and dirt, it didn't look that bad at all.
Amazingly, these were my only misadventures last weekend. Don't worry though, for anyone following this blog thirsty for more gore, I'm sure I can deliver.
Trial by Thunderstorm
It's raining today. Not just any rain but, according to my weatherlady, a full fledged, 2-day, thunderstorm. Normally this wouldn't be noteworthy except for the fact that I left the tarp off of Frostbite for the first time since I discovered that the roof leaks.
This past weekend, I did repair the large hole in the roof. By "repair" I mean that I squirted caulk into the hole until it was filled and then scraped a board across the top to make it even with the roof. Here are some pics:
Having no way to know if this successfully addressed the source of the leak and knowing it was going to rain this week, I decided to leave the tarp off and test it out.
One thing I did not know when I did this, however, was that the rain we were expecting was actually going to be a thunderstorm. I was hoping for a simple spring rain not 2 days of violent, windy, thundershowers.
I suppose this will be the ultimate test. I'll know when I pop her up this weekend. Keep your finger's crossed!
This past weekend, I did repair the large hole in the roof. By "repair" I mean that I squirted caulk into the hole until it was filled and then scraped a board across the top to make it even with the roof. Here are some pics:
Before
After
I also did a cheap, redneck-style repair of the vent. It had clear tape surrounding the edges that had started to come up in the corners. I didn't want to caulk this up because I intend to eventually replace the vent entirely with a new one. Caulking it now would just make that fix more difficult so I opted to simply update the tape fix by adding tape around the corners and across the crack on top.
Having no way to know if this successfully addressed the source of the leak and knowing it was going to rain this week, I decided to leave the tarp off and test it out.
One thing I did not know when I did this, however, was that the rain we were expecting was actually going to be a thunderstorm. I was hoping for a simple spring rain not 2 days of violent, windy, thundershowers.
I suppose this will be the ultimate test. I'll know when I pop her up this weekend. Keep your finger's crossed!
Wednesday, March 10, 2010
. . . And There Was Light!
While waiting for the goo to dry around the floor patch and the roof repairs I made, I decided to finish the lights. Confident that the $44 fuse fixed Bluebell's problem with the running lights not working, I decided to go ahead and connect all the side lights. Typical of my method of doing things, I cut wires, spliced the side light wires up, and connected everything first. I realized that I should have threaded the main wire through the frame only after this was done.
Here is a photo of the main wire. Trust me it is all spliced and correctly attached to the proper lights around the body of the camper. Notice that not only is this wire NOT threaded through the frame but it is actually wrapped around the frame. On the left near the end of the tounge, the wire is on top of the frame. On the right just before the wire disappears underneath the camper, the wire is underneath.

I unattached all the wires and spent the next hour looking for a sink snake I bought last year to unclog my bathroom sink. After an hour of emptying out bathroom and kitchen cabinets and turning my garage upside down, I found it laying in plain sight inside Frostbite. I then remembered that I had thought ahead realizing that I would need it to run the trailer wire through the frame when I first started goofing with the lights a month ago.
So much for planning ahead.
Now armed with the snake, running the wire through the trailer frame was an easy matter. I then reconnected all the wires and splices and was ready to test her out. I pulled out Bluebell intent on actually hooking her up to Frostbite this time. Yes, I did remember to remove the bunk support poles before doing this!
I hooked her up and plugged in the 4way plug between the camper and Frostbite.
Everything worked!
I dragged my wife outside to help me test. The running lights, blinkers, brake lights, hazard lights all worked perfectly. My wife went inside and I started to put the covers on the lights. Once the covers were on, I checked again. Everything looked good but I couldn't tell 100% that the yellow covered side lights were on. They were definately working before I put the covers on. I removed a cover and the bulb was not lit. I jiggled it some. Nothing.
I then noticed that all the running lights were out. I went inside Bluebell. The dash lights were out and the fog lights wouldn't work. Apparently, my $44 dollar fuse blew again. I checked fuses in Bluebell until, sure enough, I found the blown fuse. A 10-amp red one.
I didn't have any fuses but I figured I could just run up to AutoZone and get some. No, I didn't take the blown fuse with me.
At Autozone, I found a pack of 5, 10-amp, red fuses for $3.50. At the register I did have the foresight to ask if these fuses were standard sized. I was told that yes, they were standard sizes but there were 2 different sizes used. He pointed to the ones in my hand and said that there was another size fuse that looked just like that but were half the size.
The ones in my hand *seemed* like the right size so I was confident that I didn't need to look at the smaller ones. Surely the fuse wasn't THAT tiny. I would have noticed that.
Upon my return home, eager to replace the fuse, I realized that the fuses I had bought were about twice the size of what I needed. In fact, none of the fuses in Bluebell took the larger size.
Doh!
I couldn't return the wrong size fuses because I had already opened the package. No, I didn't bother to hold the unopened package up to the fuse box first to make sure it was correct. That is just not my style. I went back to AutoZone and found a 10-pack of the smaller fuses for $10. I did take the old burned out fuse with me this time but it wasn't really necessary since I had already lost the 50-50 bet.
With the new fuse inserted in Bluebell the problem was solved. However, I had already unhooked Frostbite so I didn't check those connections but I had, at least, located the $44 dollar fuse and replaced it with a $1 fuse plus I had 9 more to toy with as needed.
I am a bit concerned that it might have been too easy to blow that fuse. It could still be a ground issue as the tail lights I used did not have a ground wire since they claimed to be grounded to the frame via the screws used to attach them to the frame. The four side lights did have ground wires, However.
The chance of me doing something to blow the fuse by goofing with the light bulbs and wires when I was replacing the covers is great. If the fuse blows the next time I have Bluebell hooked up to Frostbite, I'll know that I have a problem and will address it then.
Until then, I can't know if this is the problem or if I even have a problem.
I can say that all the lights in Frostbite are wired correctly and are working. This is something that was not the case before I started goofing with it so this little project can be marked up as a completed improvement to Frostbite.
more tomorrow . . .
Here is a photo of the main wire. Trust me it is all spliced and correctly attached to the proper lights around the body of the camper. Notice that not only is this wire NOT threaded through the frame but it is actually wrapped around the frame. On the left near the end of the tounge, the wire is on top of the frame. On the right just before the wire disappears underneath the camper, the wire is underneath.
Photo evidence of idiocy
I unattached all the wires and spent the next hour looking for a sink snake I bought last year to unclog my bathroom sink. After an hour of emptying out bathroom and kitchen cabinets and turning my garage upside down, I found it laying in plain sight inside Frostbite. I then remembered that I had thought ahead realizing that I would need it to run the trailer wire through the frame when I first started goofing with the lights a month ago.
So much for planning ahead.
Now armed with the snake, running the wire through the trailer frame was an easy matter. I then reconnected all the wires and splices and was ready to test her out. I pulled out Bluebell intent on actually hooking her up to Frostbite this time. Yes, I did remember to remove the bunk support poles before doing this!
I hooked her up and plugged in the 4way plug between the camper and Frostbite.
Everything worked!
I dragged my wife outside to help me test. The running lights, blinkers, brake lights, hazard lights all worked perfectly. My wife went inside and I started to put the covers on the lights. Once the covers were on, I checked again. Everything looked good but I couldn't tell 100% that the yellow covered side lights were on. They were definately working before I put the covers on. I removed a cover and the bulb was not lit. I jiggled it some. Nothing.
I then noticed that all the running lights were out. I went inside Bluebell. The dash lights were out and the fog lights wouldn't work. Apparently, my $44 dollar fuse blew again. I checked fuses in Bluebell until, sure enough, I found the blown fuse. A 10-amp red one.
I didn't have any fuses but I figured I could just run up to AutoZone and get some. No, I didn't take the blown fuse with me.
At Autozone, I found a pack of 5, 10-amp, red fuses for $3.50. At the register I did have the foresight to ask if these fuses were standard sized. I was told that yes, they were standard sizes but there were 2 different sizes used. He pointed to the ones in my hand and said that there was another size fuse that looked just like that but were half the size.
The ones in my hand *seemed* like the right size so I was confident that I didn't need to look at the smaller ones. Surely the fuse wasn't THAT tiny. I would have noticed that.
Upon my return home, eager to replace the fuse, I realized that the fuses I had bought were about twice the size of what I needed. In fact, none of the fuses in Bluebell took the larger size.
Doh!
I couldn't return the wrong size fuses because I had already opened the package. No, I didn't bother to hold the unopened package up to the fuse box first to make sure it was correct. That is just not my style. I went back to AutoZone and found a 10-pack of the smaller fuses for $10. I did take the old burned out fuse with me this time but it wasn't really necessary since I had already lost the 50-50 bet.
With the new fuse inserted in Bluebell the problem was solved. However, I had already unhooked Frostbite so I didn't check those connections but I had, at least, located the $44 dollar fuse and replaced it with a $1 fuse plus I had 9 more to toy with as needed.
I am a bit concerned that it might have been too easy to blow that fuse. It could still be a ground issue as the tail lights I used did not have a ground wire since they claimed to be grounded to the frame via the screws used to attach them to the frame. The four side lights did have ground wires, However.
The chance of me doing something to blow the fuse by goofing with the light bulbs and wires when I was replacing the covers is great. If the fuse blows the next time I have Bluebell hooked up to Frostbite, I'll know that I have a problem and will address it then.
Until then, I can't know if this is the problem or if I even have a problem.
I can say that all the lights in Frostbite are wired correctly and are working. This is something that was not the case before I started goofing with it so this little project can be marked up as a completed improvement to Frostbite.
more tomorrow . . .
Tuesday, March 9, 2010
The Infamous Patch
Finally, after this weekend, I'm going to mark the status of the floor patch as "Completed." I wanted to collect all the work on this issue into one post even though it took me over a month from start to finish.
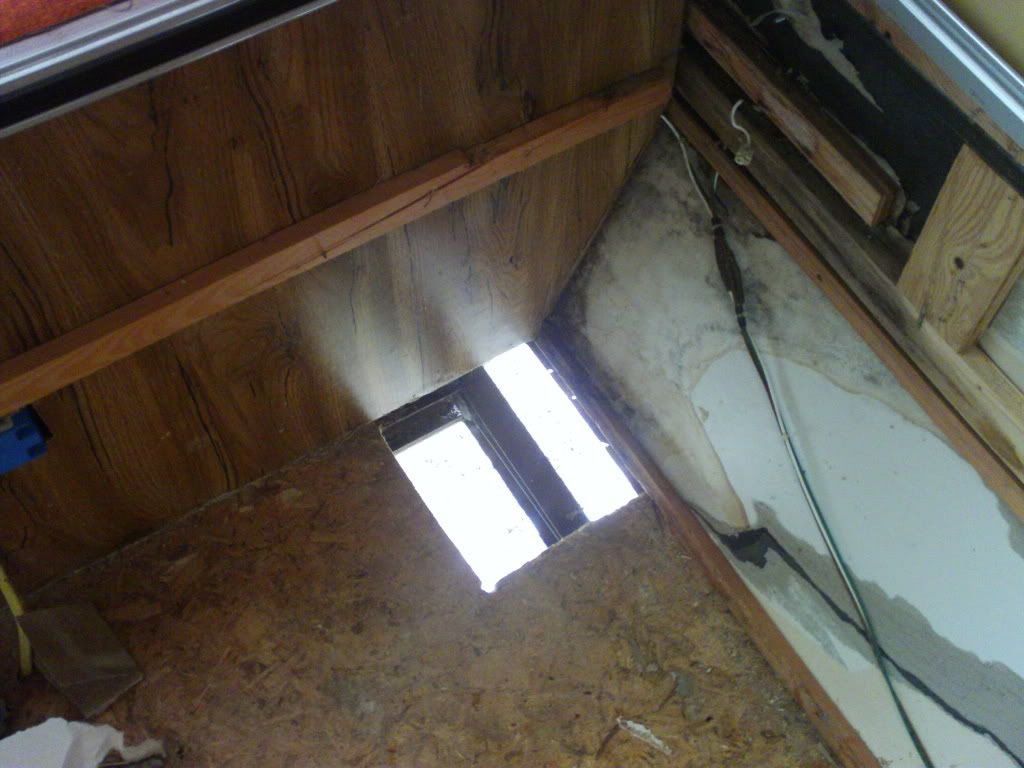
Here is the hole after I poked through some rotted wood in the corner:
I purchased a jig-saw and cut out a square making sure that I got out all the rotted wood:
After much adventure obtaining the wood and getting it to fit in the hole, I eventually found a piece of wood that fit (sort of).
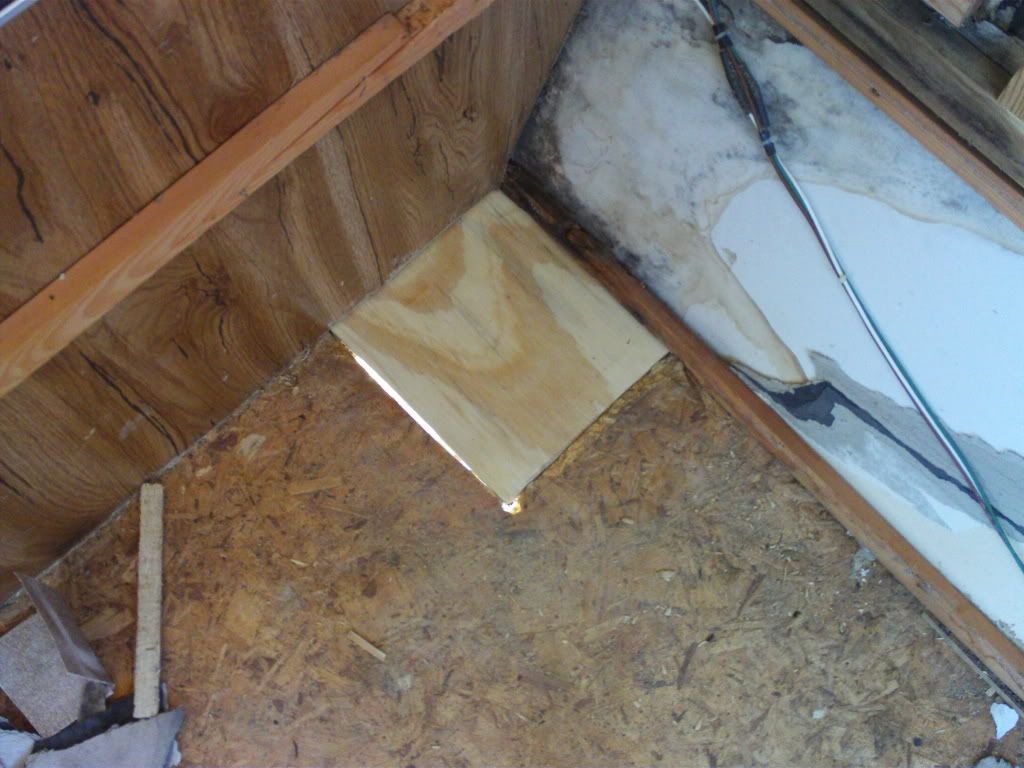
I attached the outside wall to the new patch with screws. I used some spray foam insulation to fill in the gaps and, once it dried, cut off the excess so that it was even with the floor. Next I used wood filler around the edges (not real sure why exactly. It just seemed like a good idea.)
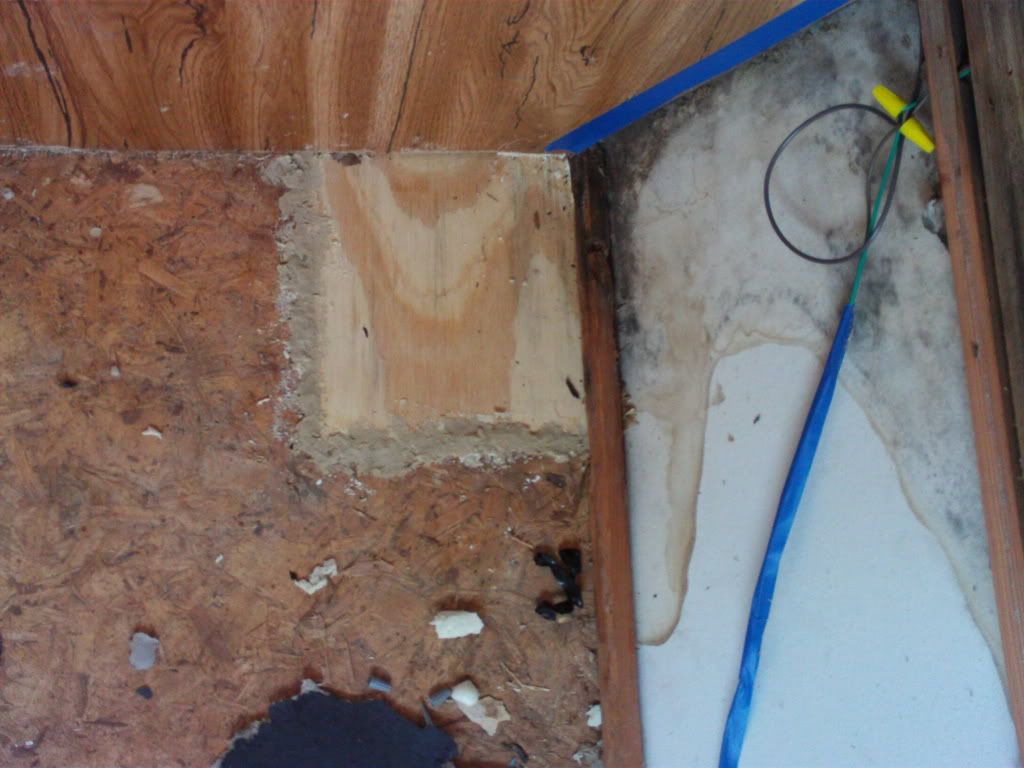
I realize that it looks terrible but I was just waiting for it to dry so I can sand it smooth. I did use a wall scraper to push the wood filler down into the crack around the patch as much as possible. After it dried, I plugged my hand sander up and sanded it all smooth.
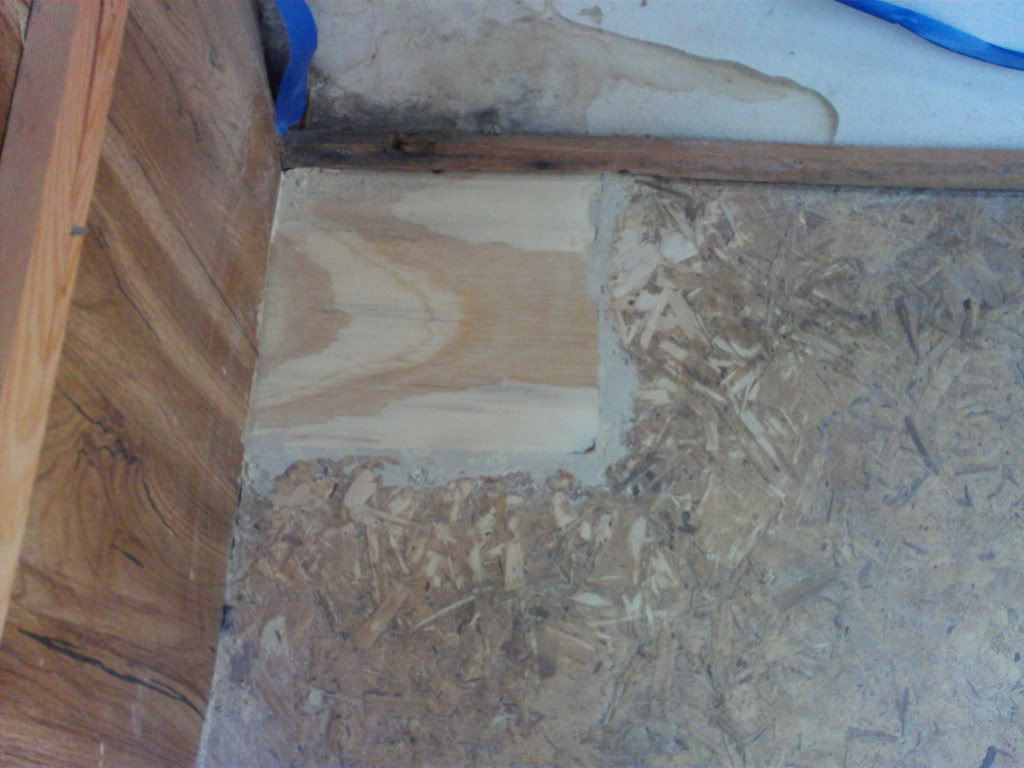
Hey, it might be ugly but it is as smooth as glass. Rubbing your hand on the floor, you wouldn't be able to tell where the patch starts and the floor ends. The look doesn't matter much anyway since I will be laying a new floor on top of it.
I know it's not beautiful work but I am quite proud of it.
more tomorrow . . .
Here is the hole after I poked through some rotted wood in the corner:
I purchased a jig-saw and cut out a square making sure that I got out all the rotted wood:
After much adventure obtaining the wood and getting it to fit in the hole, I eventually found a piece of wood that fit (sort of).
I attached the outside wall to the new patch with screws. I used some spray foam insulation to fill in the gaps and, once it dried, cut off the excess so that it was even with the floor. Next I used wood filler around the edges (not real sure why exactly. It just seemed like a good idea.)
I realize that it looks terrible but I was just waiting for it to dry so I can sand it smooth. I did use a wall scraper to push the wood filler down into the crack around the patch as much as possible. After it dried, I plugged my hand sander up and sanded it all smooth.
Hey, it might be ugly but it is as smooth as glass. Rubbing your hand on the floor, you wouldn't be able to tell where the patch starts and the floor ends. The look doesn't matter much anyway since I will be laying a new floor on top of it.
I know it's not beautiful work but I am quite proud of it.
more tomorrow . . .
Monday, March 8, 2010
Metal Shop? We don't need no stinking Metal Shop!
As promised by my weather lady, the weather this weekend was outstanding. I spent six hours on Frostbite on Saturday and about 2 hours on Sunday and, for me anyway, made great progress.
I decided to tackle the safety hook first. Instead of cringing everytime I raised Frostbite waiting for the lift cables to snap while enduring the scrapes and pops as the bent safety hook was dragged along the underside of the trailer, I decided to remove it.
I had called and talked with the Starcraft parts department a few weeks ago and was told that the factory that made these safety hooks had long since been closed down. The fellow I was talking to asked "Can't you have one made locally?" I said "sure, I suppose so" although I really don't know where or how these things are done. My father suggested that there are metal shops around that I could take the part in, describe the problem, and they could make me another. It seemed reasonable enough.
I was already using the chain around the crank to keep the roof up anyway since the hook no longer actually "hooked" to anything because it was bent. The loss of the safety hook would just allow the roof to crank up easier and, as my father suggested, allow me to take it to a metal shop to be fixed or replaced.
I asertained that the safety hook could be removed. It was not welded to anything. One end was bent up at a 90 degree angle and slid into what Dusty identified as the whiffle tree and the bar itself ran through another metal piece that was attached to a larger metal piece that held the end of the lift cable. The safety hook appeared to be held in place at the top by a cotter pin (Is that the correct term?)
Attempts to remove the cotter pin quickly resulted in me breaking it off. No real loss because it didn't seem to contribute anything to holding the bar on since it was still very firmly attached. Now I had to address the metal bar that the safety hook ran through before I could pull it down and out of the hole.
A couple of things made this next move particularly dangerous. First, the metal bar was attached to the same bolt that was holding the wiffle bar to the main lift cable. Removing that bolt would result in the wiffle tree and all the corner roof lifts coming unattached to the main lift cable. Second, to even get to the bar so I can work on it, I had to raise the roof about six inches. The sudden seperation of the lift cable from the wiffle tree and the resulting slamming down of the roof was a distinct possibility.
Contemplating my situation and realizing that I would be there underneath the trailer when this occurred, I decided "well, what's the worst that can happen?" I really had no other options. Unless I sawed it in half with a hack saw, the bar wasn't coming off any other way.
I decided to proceed.
Getting my tools in place to remove the bolt was a challenge since I had to turn the nut with one tool and hold the bolt at the other end with another tool to keep it from turning. As I was loosening the bolt I noticed that the bar through which the safety hook was threaded was getting looser. Eventually, it was loose enough to pull the end of the safety bar out of the hole in the wiffle tree. I backed it out of the other metal piece and it was free.
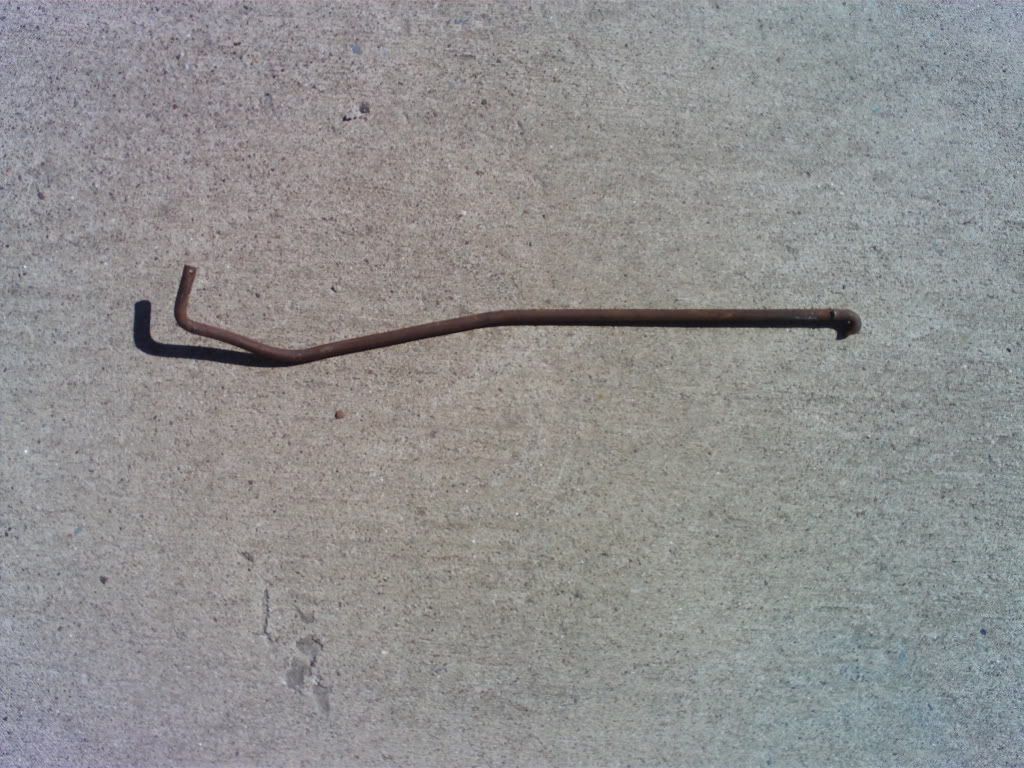
The roof didn't come crashing down since I didn't have to remove the main bolt entirely. This was a lucky break for me. Here is the bent safety hook.
I decided to tackle the safety hook first. Instead of cringing everytime I raised Frostbite waiting for the lift cables to snap while enduring the scrapes and pops as the bent safety hook was dragged along the underside of the trailer, I decided to remove it.
I had called and talked with the Starcraft parts department a few weeks ago and was told that the factory that made these safety hooks had long since been closed down. The fellow I was talking to asked "Can't you have one made locally?" I said "sure, I suppose so" although I really don't know where or how these things are done. My father suggested that there are metal shops around that I could take the part in, describe the problem, and they could make me another. It seemed reasonable enough.
I was already using the chain around the crank to keep the roof up anyway since the hook no longer actually "hooked" to anything because it was bent. The loss of the safety hook would just allow the roof to crank up easier and, as my father suggested, allow me to take it to a metal shop to be fixed or replaced.
I asertained that the safety hook could be removed. It was not welded to anything. One end was bent up at a 90 degree angle and slid into what Dusty identified as the whiffle tree and the bar itself ran through another metal piece that was attached to a larger metal piece that held the end of the lift cable. The safety hook appeared to be held in place at the top by a cotter pin (Is that the correct term?)
Attempts to remove the cotter pin quickly resulted in me breaking it off. No real loss because it didn't seem to contribute anything to holding the bar on since it was still very firmly attached. Now I had to address the metal bar that the safety hook ran through before I could pull it down and out of the hole.
A couple of things made this next move particularly dangerous. First, the metal bar was attached to the same bolt that was holding the wiffle bar to the main lift cable. Removing that bolt would result in the wiffle tree and all the corner roof lifts coming unattached to the main lift cable. Second, to even get to the bar so I can work on it, I had to raise the roof about six inches. The sudden seperation of the lift cable from the wiffle tree and the resulting slamming down of the roof was a distinct possibility.
Contemplating my situation and realizing that I would be there underneath the trailer when this occurred, I decided "well, what's the worst that can happen?" I really had no other options. Unless I sawed it in half with a hack saw, the bar wasn't coming off any other way.
I decided to proceed.
Getting my tools in place to remove the bolt was a challenge since I had to turn the nut with one tool and hold the bolt at the other end with another tool to keep it from turning. As I was loosening the bolt I noticed that the bar through which the safety hook was threaded was getting looser. Eventually, it was loose enough to pull the end of the safety bar out of the hole in the wiffle tree. I backed it out of the other metal piece and it was free.
The roof didn't come crashing down since I didn't have to remove the main bolt entirely. This was a lucky break for me. Here is the bent safety hook.
This bar is supposed to be straight
I crawled out from under Frostbite and sat there nursing the wounds on my hand that I had collected trying to take if off. Looking at the bent bar I wondered if I could straighten it myself. I figured there was noting to lose really and I needed a break from underneath the deathtrap camper anyway so I searched around my garage for something I could use to bend the thing.
I tried the plastic vice built into the top of my toolbox but, of course, it wasn't strong enough. I found a piece of 2x4 and tried various ways of standing on it with the bar underneath, using it against my knee and tugging at the bar, laying it down on the wood and wacking it with a hammer like a medieval blacksmith. This last one got the interest of my daughter and I let her smack it a few times.
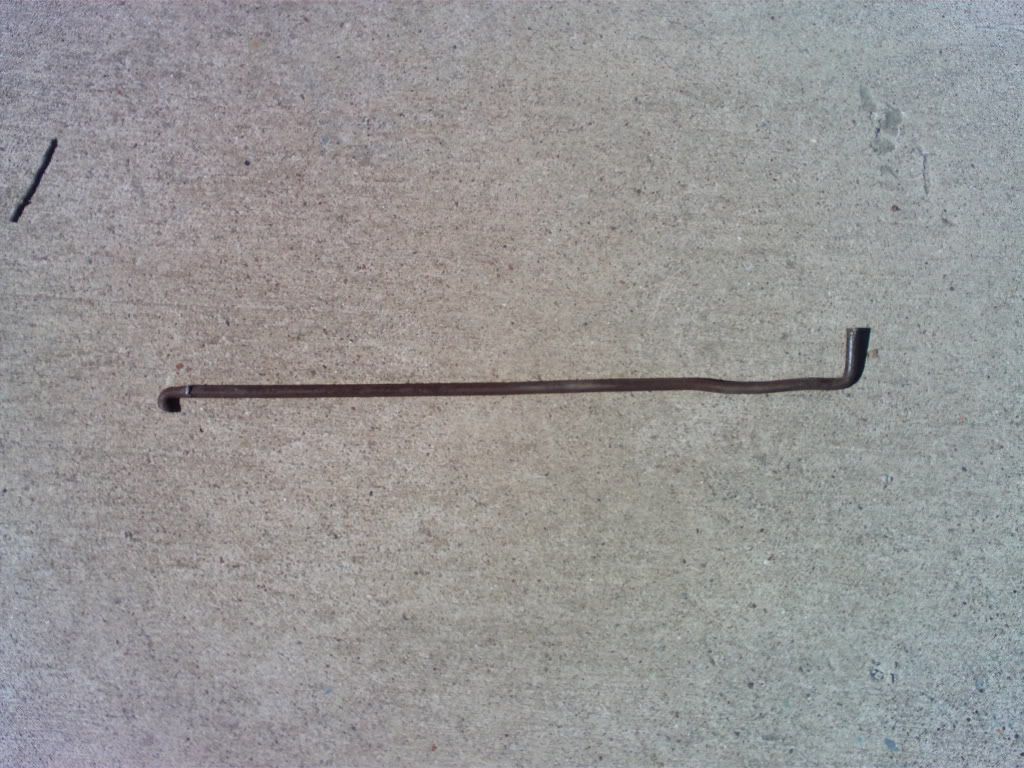
Believe it or not, this actually worked. Here is the end result:
A masterpiece!
I reattached the new hook and tightened the main bolt a bit. This was maddenly more difficult now since the safety hook, no longer bent anymore, was in the @#$% way! I could only get my tools in so that I only turned the nut maybe 1/8th of a turn before having to re-set my tools. It was slow and frustrating. I tightened until I got sick of it and opted to get it fully tight another day. It *seemed* like it would work ok until then. While underneath, I also noticed where the individual lift pole cables could be adjusted so I knew I would be back underneath to work on that before too long.
I tested it out and raised the roof. The hook slid exactly into place and hooked onto the trailer frame when the roof was fully raised. Who needs a metal shop anyway when you've got hammers, brute strength, and dumb luck?
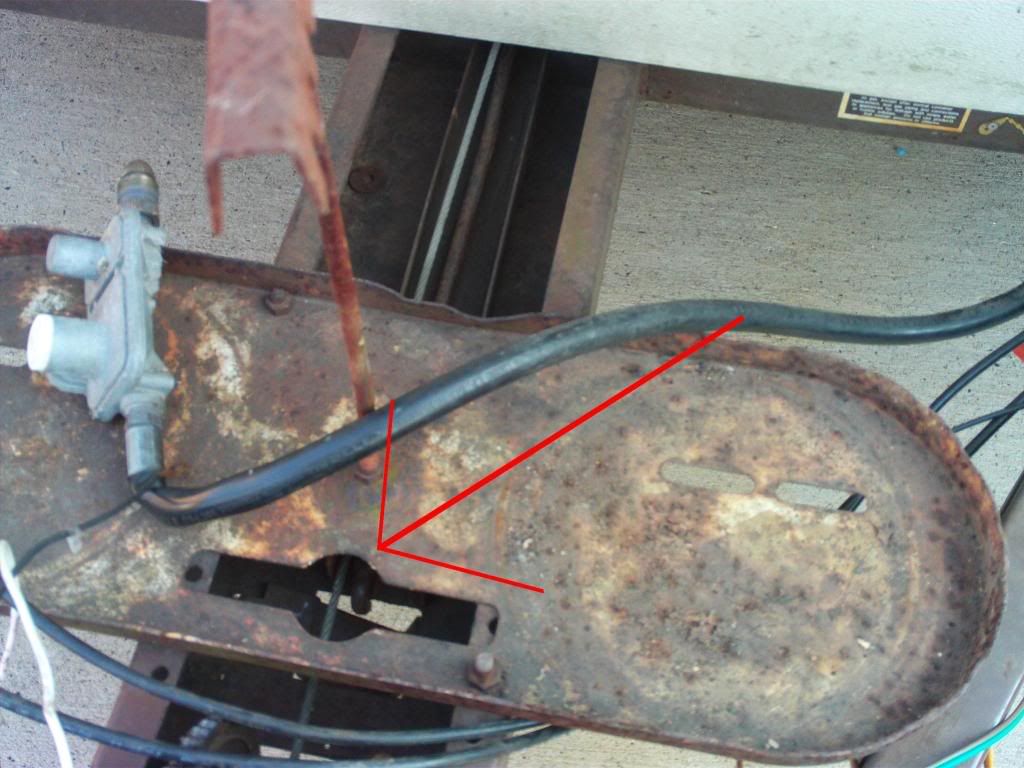
Spraying some cable grease on the crank and wench parts stopped the sqeaking, too. Here is the safety bar in place:
The arrow is pointing to where the safety bar hooks onto the frame when the roof is up.
Success! This was a big one for me too. I did a whole lot more work on Frostbite this weekend which I'll detail in future posts.
Friday, March 5, 2010
Finally, a Nice Weekend
Can Spring be around the corner? This weekend promises to be wonderful. Sunny and mid to high 60's for both Saturday and Sunday. I plan to work a good bit on Frostbite and have a list of what I hope to accomplish:
* finish wiring all lights on Frostbit
* crawl underneath and attach new light wires to the underside
* repaint the inside back wall
* touch up floor patch with wood filler and sand smooth when dry
* caulk the roof and corners around the lift poles
* try to remove the "safety hook" that I stupidly bent a few weeks ago
* fill in all old screw holes in the floor with wood filler
* repaint the ceiling. This one is questionable as I'm not sure I have enough paint.
* assuming everything above goes well, I might even start to lay down the new floor
Money is tight this weekend so I'm not going to make any supply runs which rules out installing new insulation in the back wall and installing new paneling. Once I do make a supply run for paneling, insulation, and wood dowels, I will be able to start rebuilding the inside boxes.
Ideally, I would like to purchase the AC and a small microwave before I start rebuilding the boxes so I can incorporate room for these permanent applicances in the boxes. Money, however, might not be flowing freely enough to do this. I can measure the microwave I plan to get and work that way, I suppose.
I'll cross that bridge when I get there.
Another job I'll need to tackle is to use a wire brush on the trailer frame and the axel and get the rust off. I'll see if I'm motivated to start this weekend or not. I don't have the anti-rust paint yet, though, but I have already purchased the wire brushes.
I have decided that I will paint the frame black instead of the bright blue I initially thought. I think it will look much better overall.
I'm hoping the pictures I start posting here of my progress will start showing Frostbite in better shape each time. There is really nothing left to tear apart anyway. Soon, I'll have to start putting it all back together.
Tuesday, March 2, 2010
The $44 fuse
Bluebell is as good as new
. . . except for the nasty dent I scraped into her from the bunk support pole.
Other than that, Bluebell is back home as good as new. It turned out to be a fuse. I know I checked all the fuses before deciding to take her to the shop but that is what it was. In my defense, the blown fuse must not have been obvious because they worked on her for over an hour trying to trace the problem before they rechecked the fuses and found the bad one.
That fuse cost me $44.
I haven't hooked her up to Frostbite yet, of course, but I feel confident that the running lights will be working now. It should be easier to hook up the side lights and test them now also.
It is March now and it was snowing this morning. This winter seems like it will never end. Frostbite was aptly named as I will remember this winter for a long long time as the worst in TN since I've been alive.
Hopefully, this coming weekend will be nice. I would very much like to caulk the roof so I can ditch the tarp. It is a major pain to put on and take off everytime I work on her.
Monday, March 1, 2010
Bluebell is going to the hospital
I'm taking Bluebell to the hospital today @ 1:00pm. We realized (too late to take Sunny instead) on our trip to Natchez Trace on Friday that Bluebell's taillights aren't working. The blinkers and brake lights are fine; just no taillights. There are no dash lights either. The fog lights also don't work but we rarely if ever use those anyway. We made it to the park ok and haven't been out after sunset since.
I know what you are thinking! I was working on the lights the previous weekend and it would be too much of a coincidence for the lights to stop working while I was working on Frostbite's lights. However, as I mentioned in a previous post that Bluebell's lights were acting oddly prior to be goofing with them. The digital odometer had gone very very dim and wouldn't adjust with the dash light brightness knob. Also, more importantly, all I did was hook Frostbite up to Bluebell via the 4-pin connector. I couldn't get Frostbite's running lights to come on then. In other words, Frostbite's lights don't work in exactly the same way that Bluebell's light don't work.
I did get some pliers and checked all of Bluebell's fuses when I was first hooking up Frostbite's lights but didn't notice any problems.
For that matter, I don't know how long Bluebell's taillights have been out since we rarely take her out after dark.
Confident that the problem lies with Bluebell and there is a good chance that I didn't cause it, I made an appointment with CarMax today for her to get looked at. Hopefully a simple fix but we did purchase the extended warranty when we bought her so, no matter what the problem is, it should only cost us 50 bucks.
Other than that, we had a great time this weekend. Great food at the state park restraunt. Drove through Lexington, TN on Sat, saw a movie in their local 1-screen theater, The Lightning Thief, and generally had a nice relaxing time.
We got back around lunch time on Sunday but, although it was sunny, it was still very cold so I opted not to work on Frostbite. After I get the lights fixed on Bluebell (which will also fix Frostbite's lights) I'll finish wiring up the side lights and get the back wall painted and put back together.
It would be handy if next weekend was nice but they are calling for a sleet/snow mix tonight and tomorrow here in TN. Is this winter ever going to end?
Subscribe to:
Posts (Atom)